Sonya Walkthrough เฉลยเกมส์ SONYA
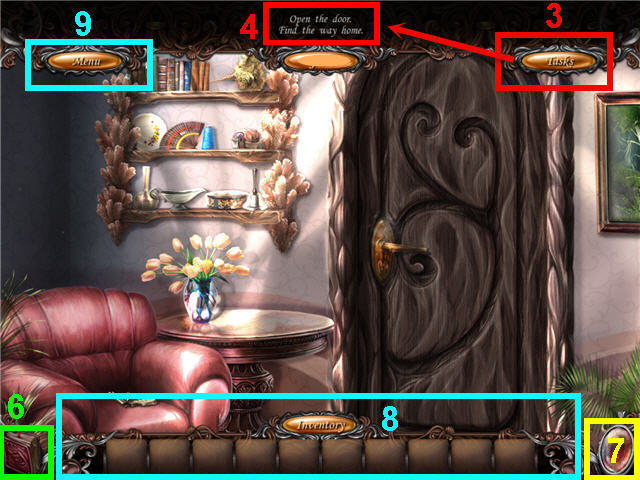
- Click on tasks (3) to lower the bar and see your current tasks (4).
- Click on the diary (6) to get story updates, Sonya's thoughts and tips. The Diary will sparkle when there is a new update.
- Click on the red locket after it finishes sparkling (7) to get a hint in regular game play or a Hidden Object Scene. To get a hint in a Hidden Object Scene, click on the red locket, and then click on the item name in the list you wish to find.
- Move your cursor over the bottom of the screen to access the inventory bar (8).
- Inventory Items with a '+' next to them can be combined. Drag and drop the item on the item you wish to combine it with.
- There are items that must be examined in order to trigger Hidden Object Scenes. If you do not have a Hidden Object Scene where it is listed in the walkthrough, please check the guide for anything you may have missed.
- Click on menu (9) to exit the game.
Chapter 1- Kidnapped
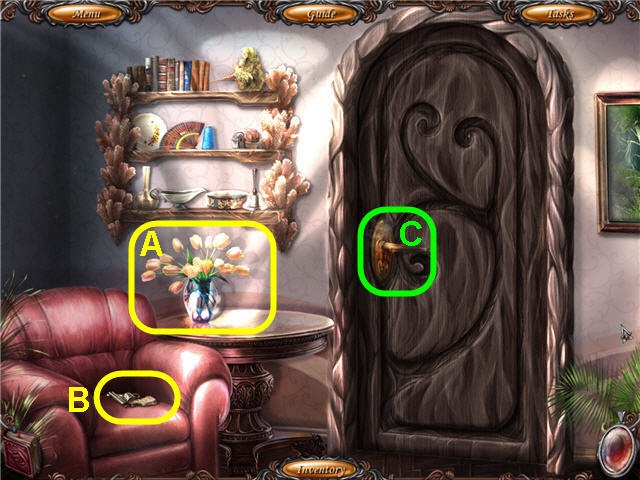
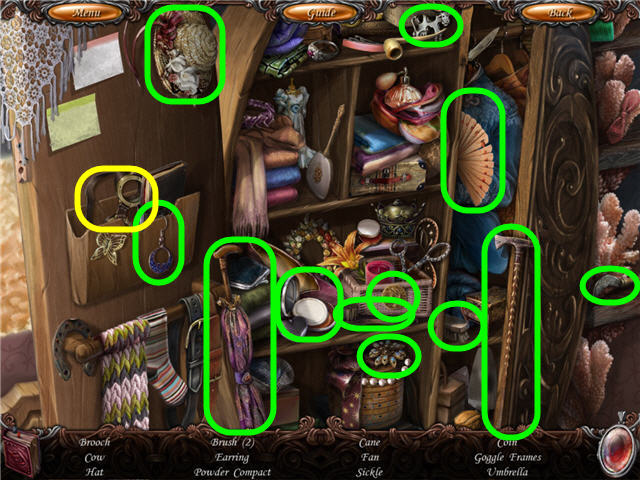
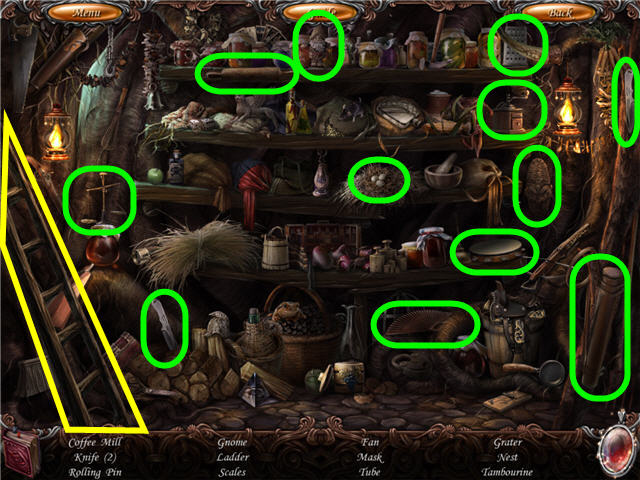
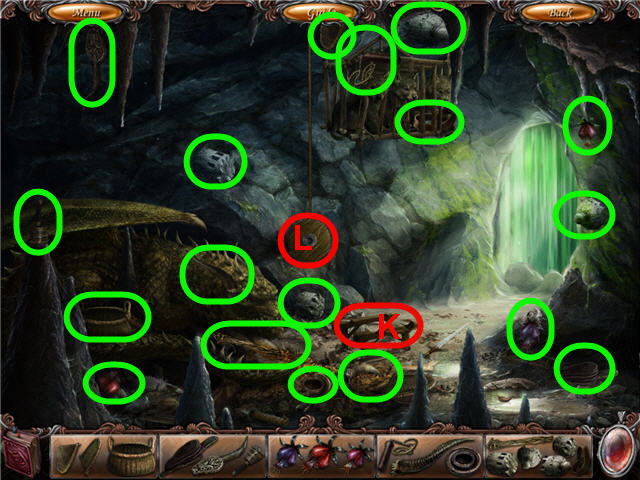
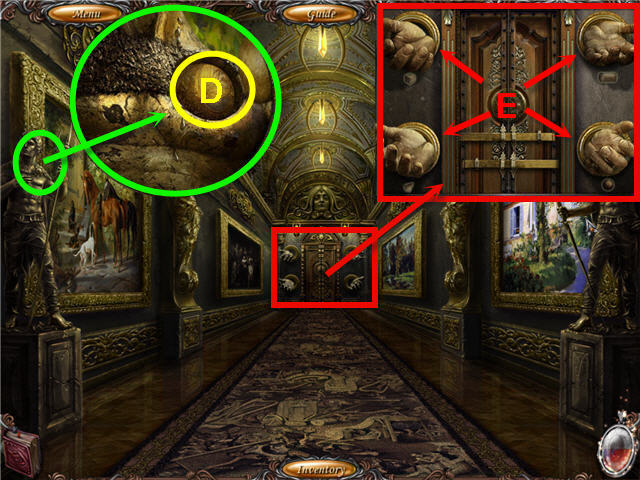
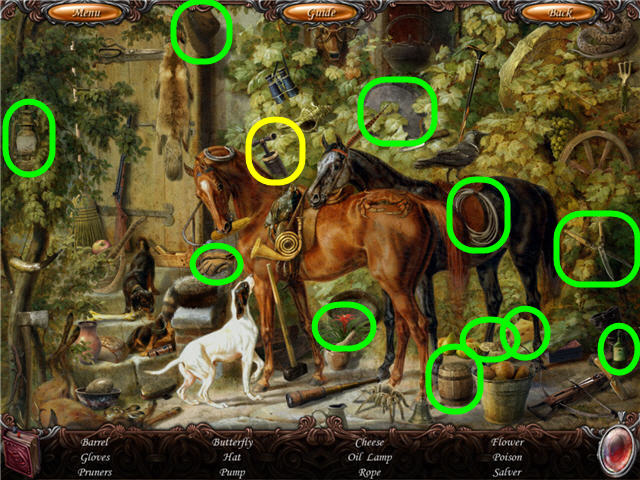
- Take the VASE WITH WATER (A) and the UNLOADED REVOLVER (B).
- Use the VASE WITH WATER on the door handle (C).
- Back out.
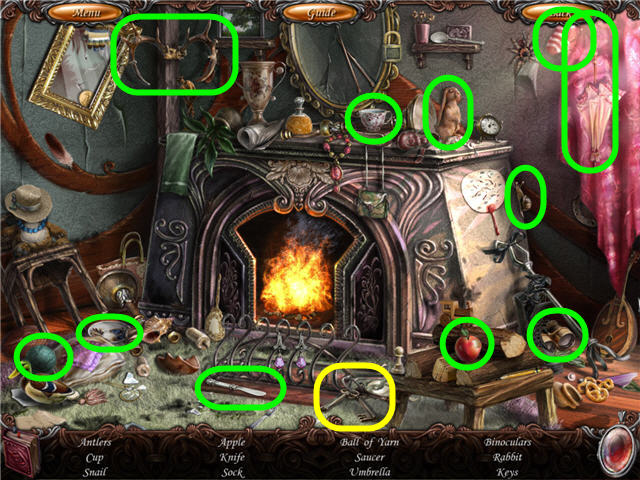
- Click on the bed to access a Hidden Object Scene.
- Find the items listed and get BULLETS.
- In Inventory; combine the BULLETS with the UNLOADED REVOLVER to get a REVOLVER.
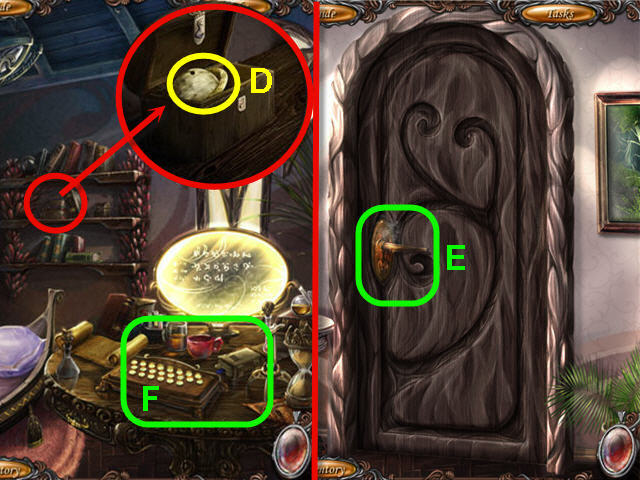
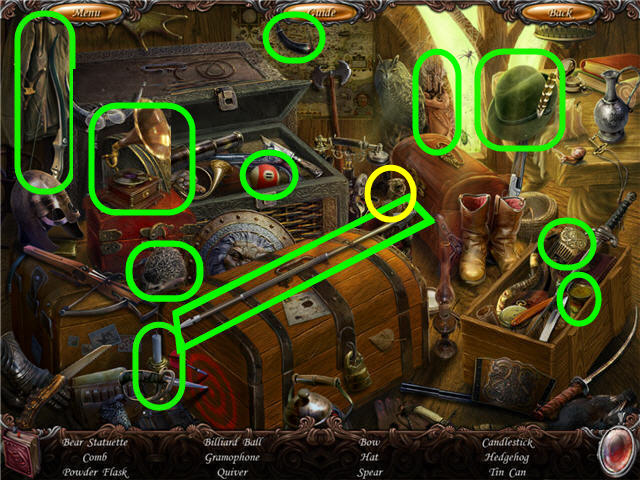
- Examine the shelves; open the chest and take the JUPITER MODEL (D).
- Back out.
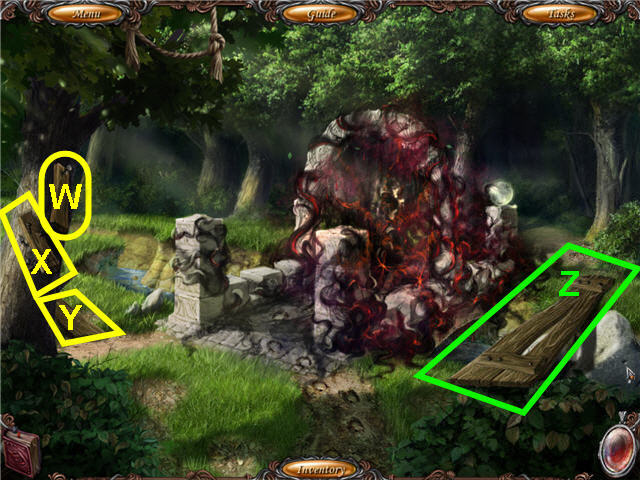
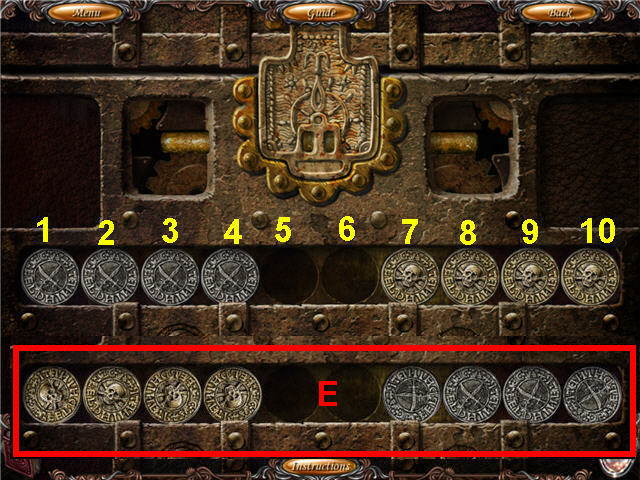
- Use the REVOLVER on the door handle (E).
- Back out.
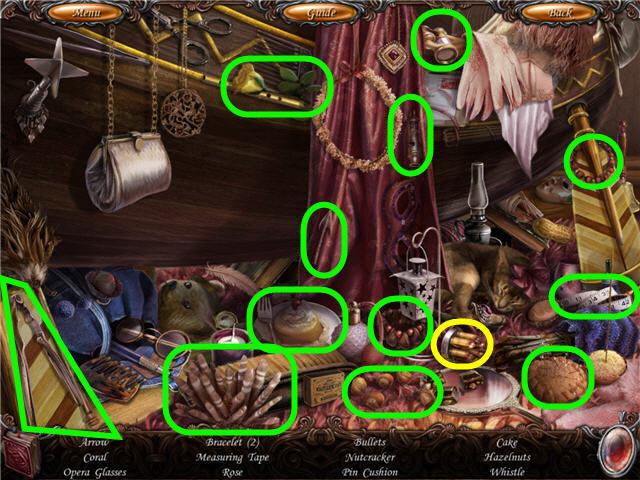
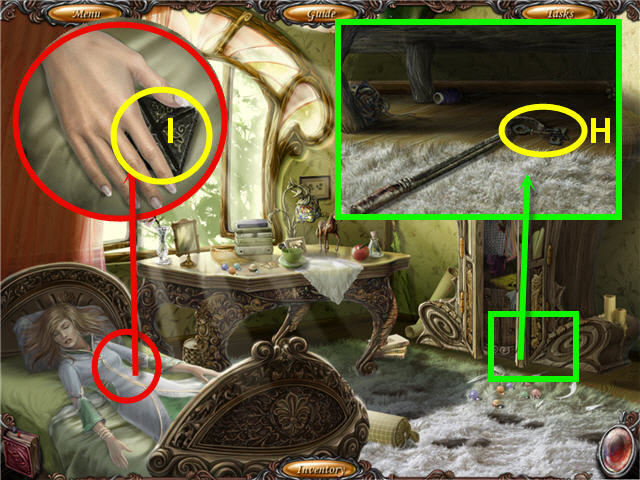
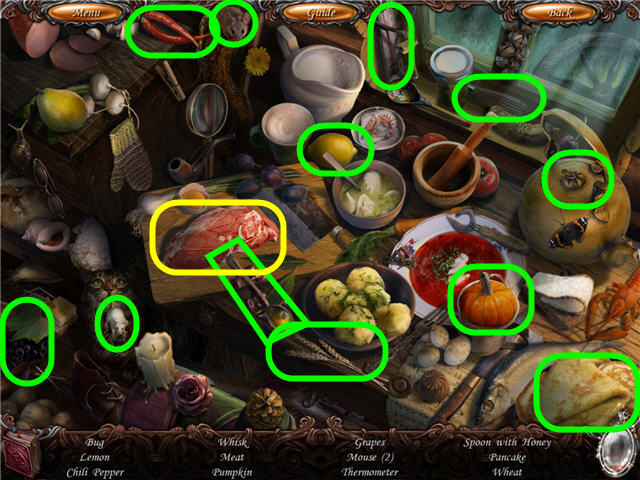
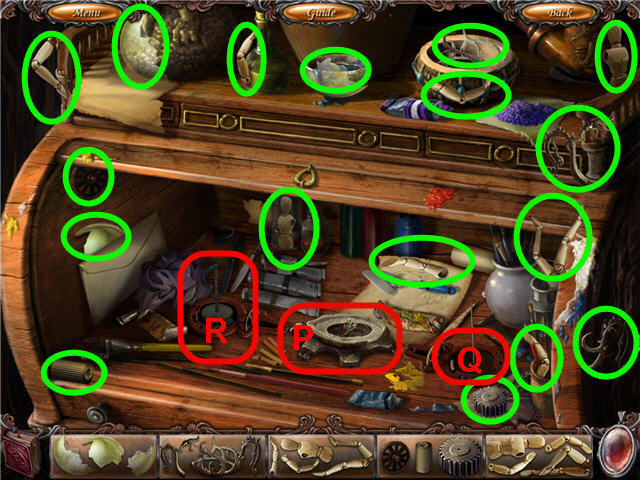
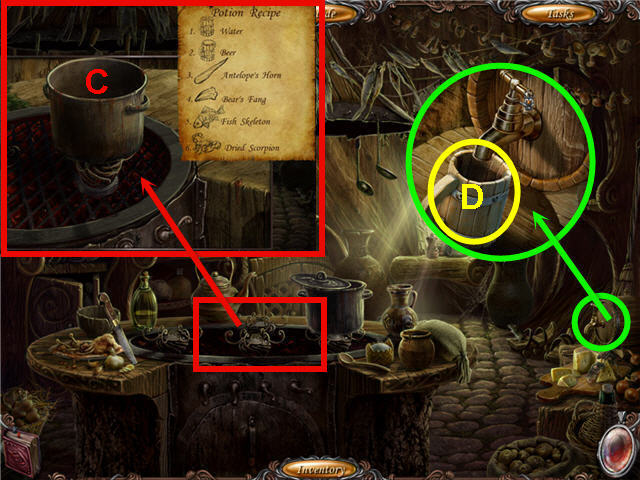
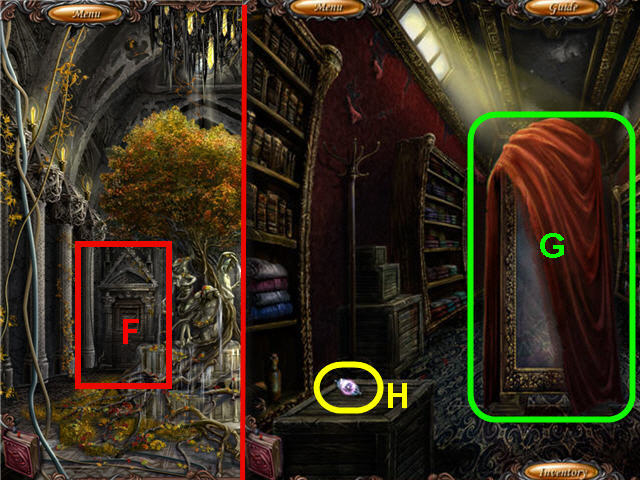
- Click on the table (F) to access a Hidden Object Scene.
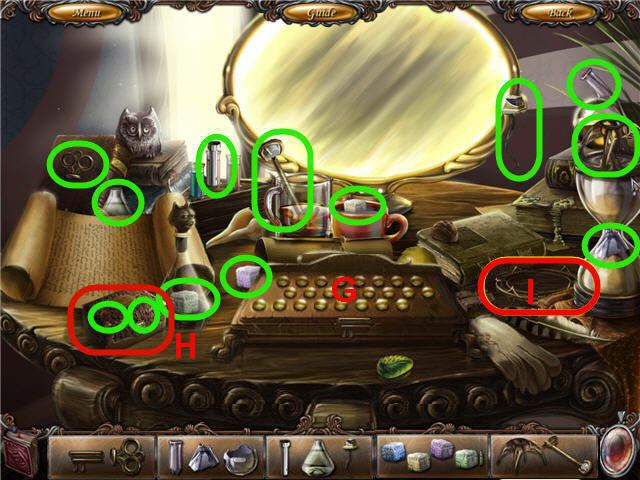
- Find the fragments and get a KEY, FLASK, LIGHTER, REAGENT and FLASK HOLDER.
- Move the pedestal (G) to get a reagent.
- Assemble the KEY and use on the box (H); take the flask and reagent piece.
- Place the FLASK HOLDER and FLASK on the stand (I).
- Place the REAGENT in the flask and light with the LIGHTER.
- Take the EXPLOSIVE.
- Back out.
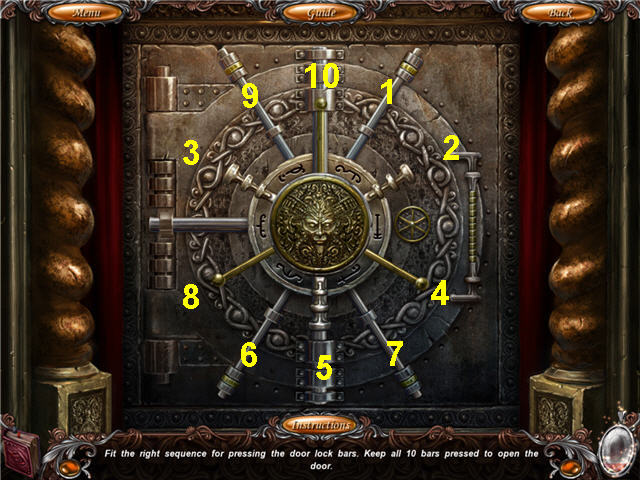
- Use the EXPLOSIVE and the REVOLVER on the door handle.
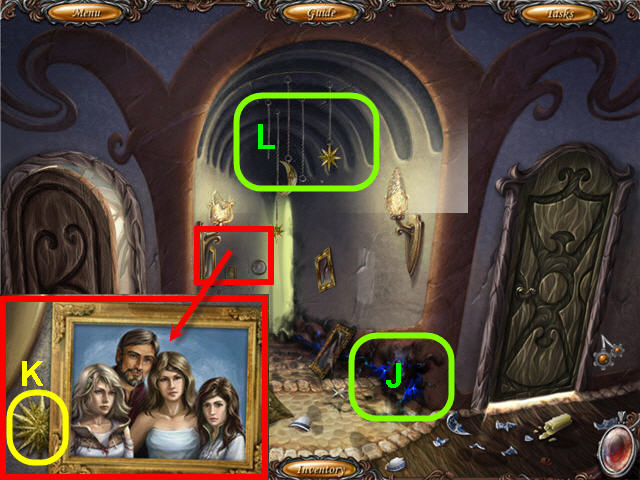
- Click on the right door.
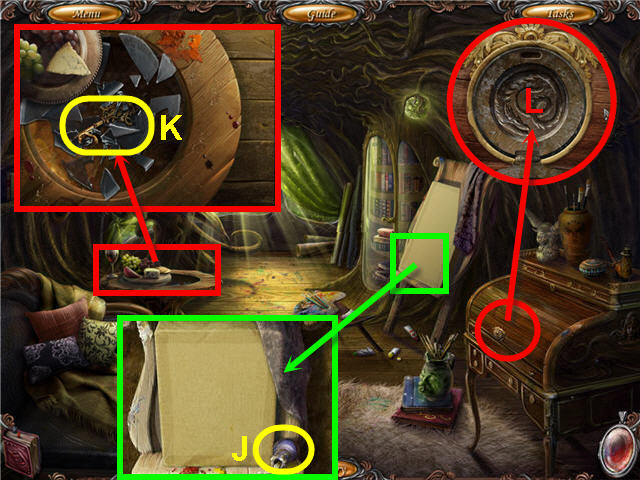
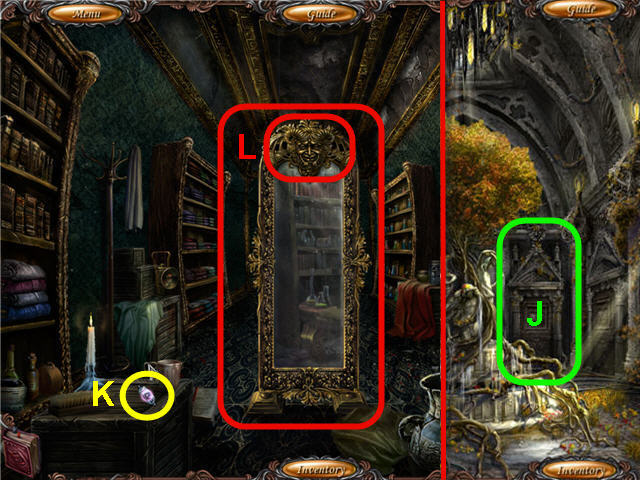
- Examine the blue orb (J); click on it.
- Examine the picture; take the SUN (K).
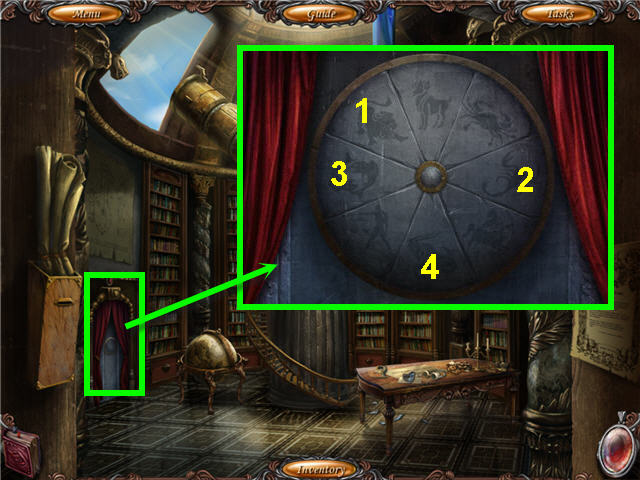
- Place the JUPITER MODEL and SUN by the hanging moon (L) to trigger a puzzle.
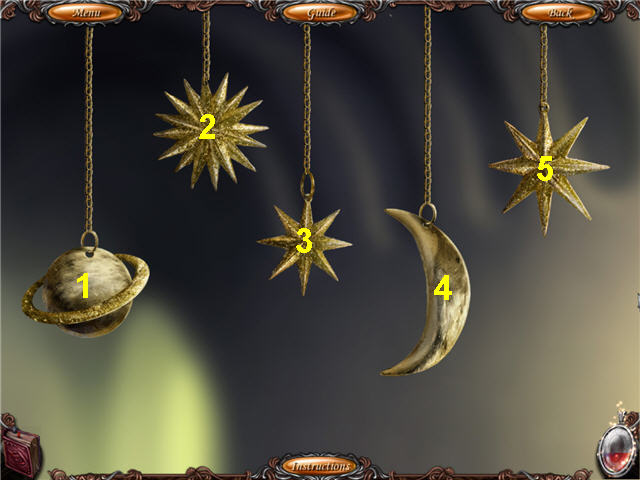
- Watch the stars and planets light up and duplicate the sequences.
- My solution is; 4535, 32451, 425424.
- Examine the hatch above the hanging stars.
- Head into the left room.
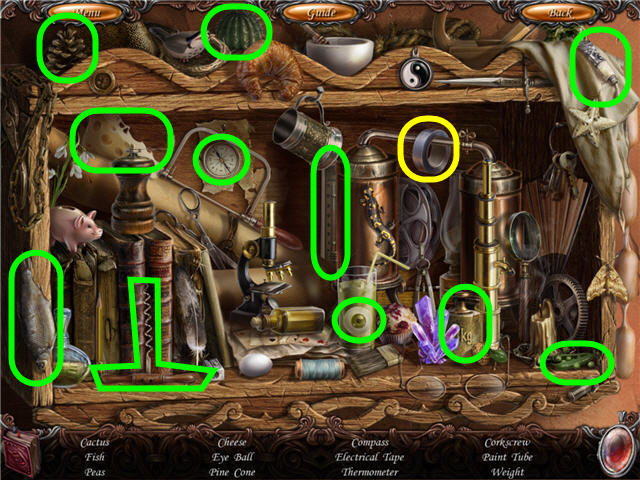
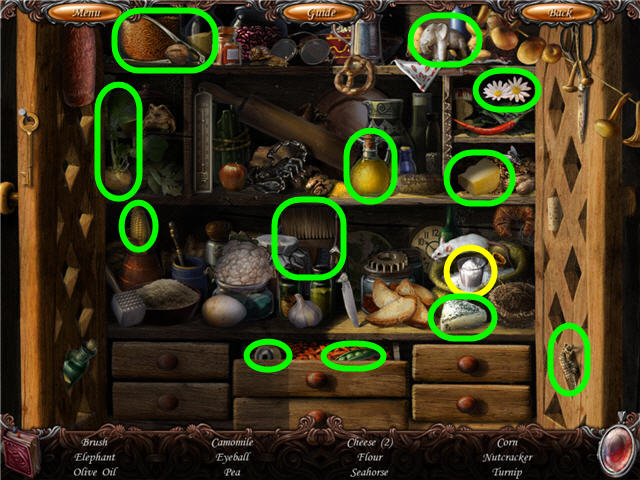
- Click on the wardrobe to access a Hidden Object Scene.
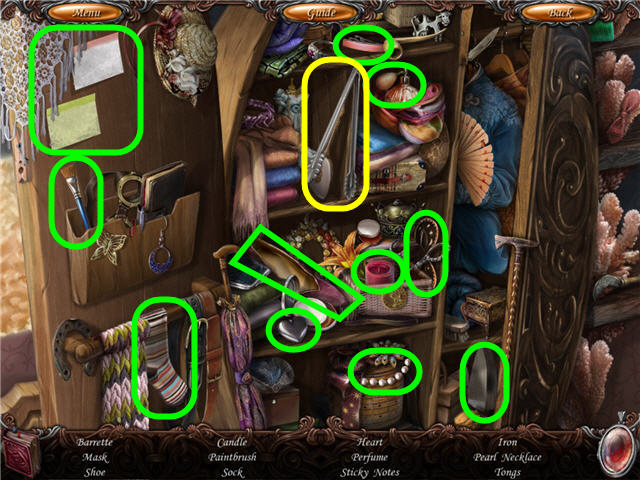
- Find the items listed and get TONGS.
- Back out.
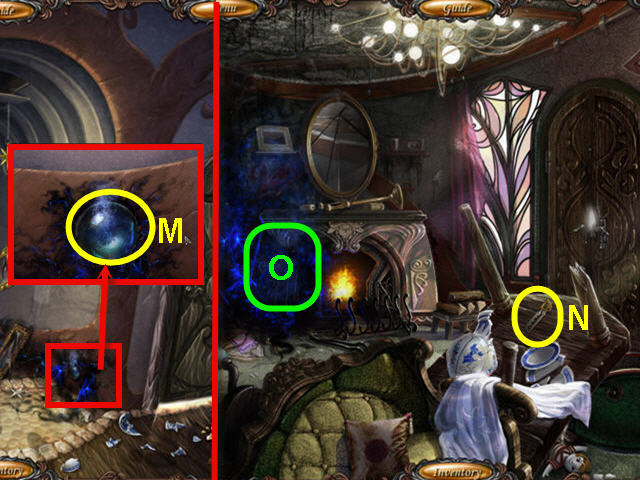
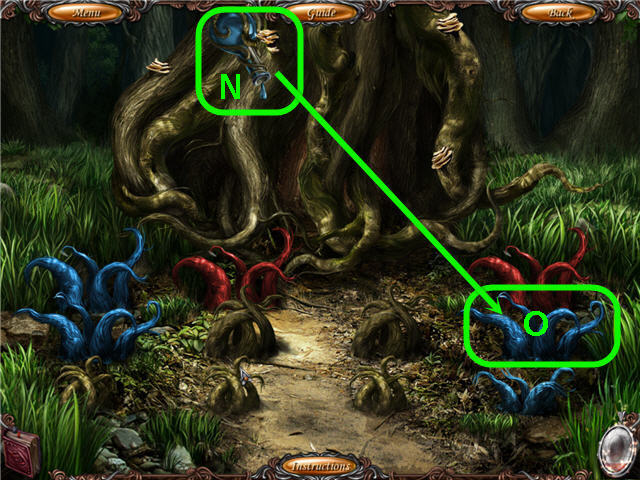
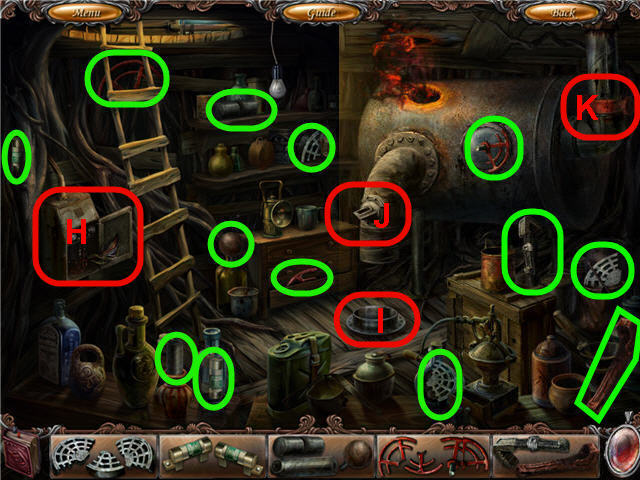
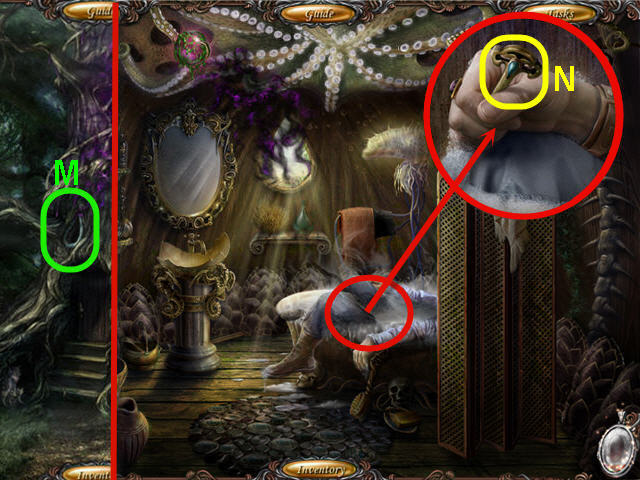
- Examine the orb; use the TONGS to get the BLUE ORB (M).
- Head forward.
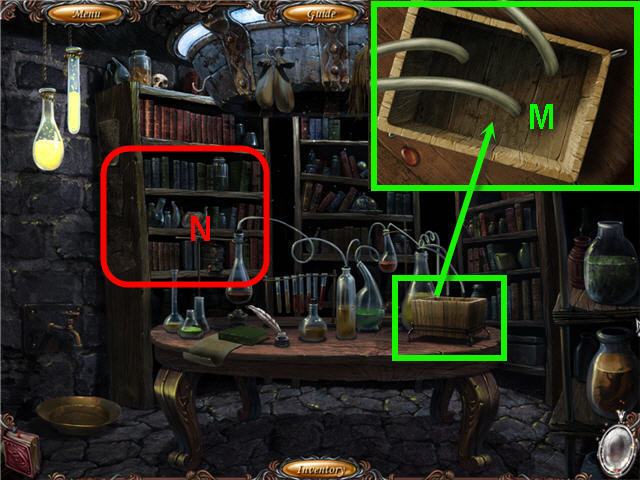
- Examine the table; take the ELECTRIC CARD KEY (N).
- Use the BLUE ORB on the blue smoke (O) to get a LOADED BLUE ORB.
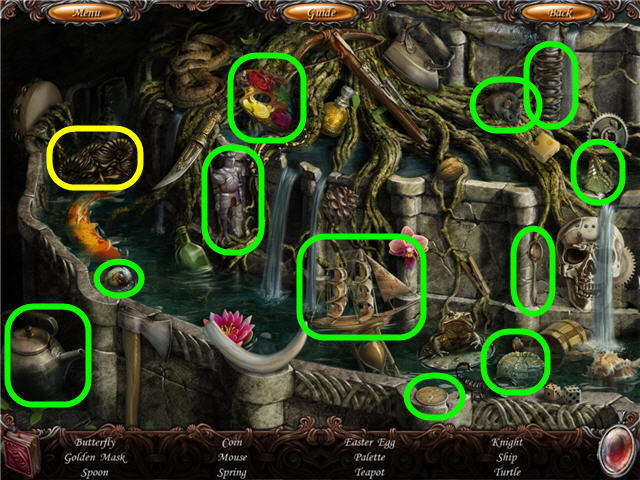
- Click on the fireplace to access a Hidden Object Scene.
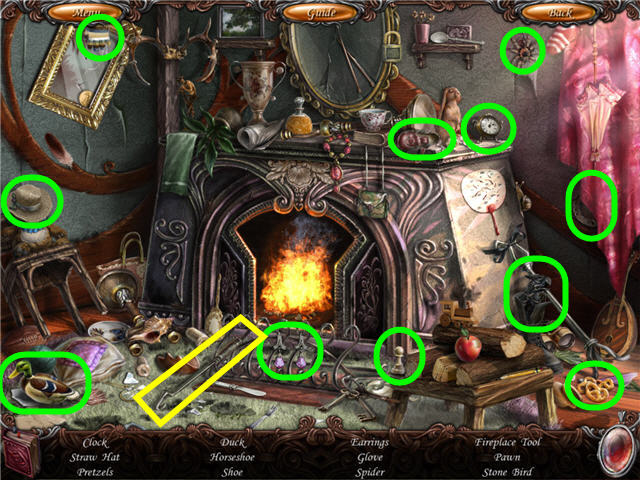
- Find the items listed and get a FIREPLACE TOOL.
- Back out.
- Use the FIREPLACE TOOL on the attic hatch and examine it.
- Head into the left door.
- Click on the bed to access a Hidden Object Scene.
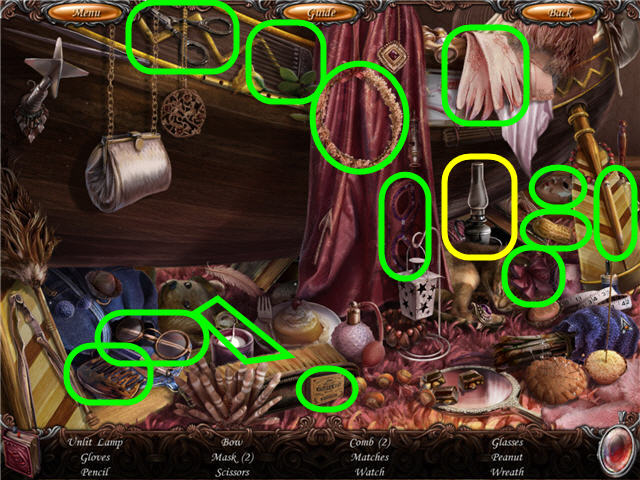
- Find the items listed and get an UNLIT LAMP.
- Back out and head forward.
- Use the UNLIT LAMP on the fireplace to get a LIT LAMP.
- Back out.
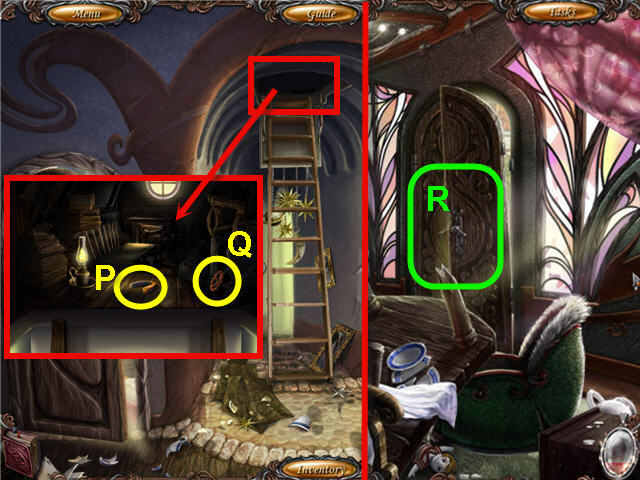
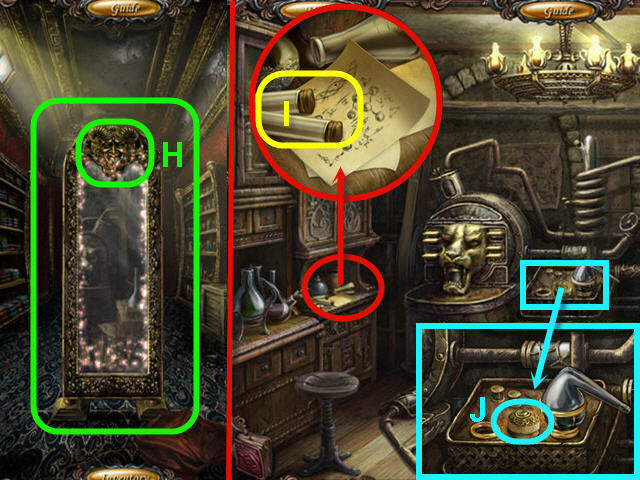
- Examine and use the LIT LAMP on the hatch.
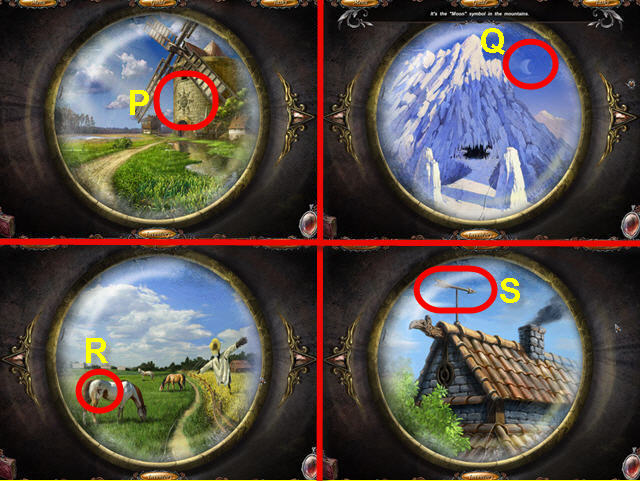
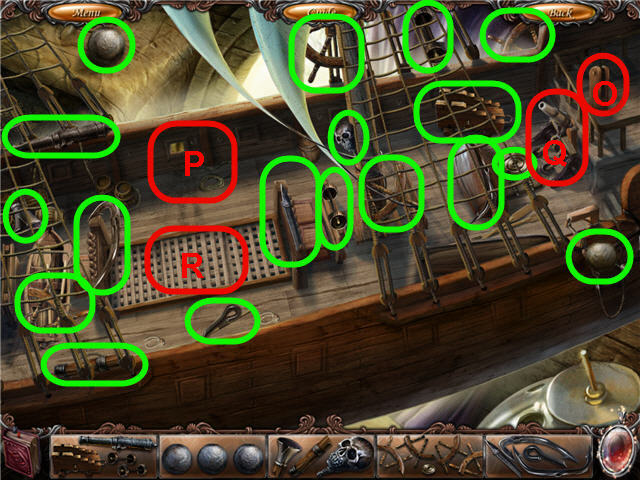
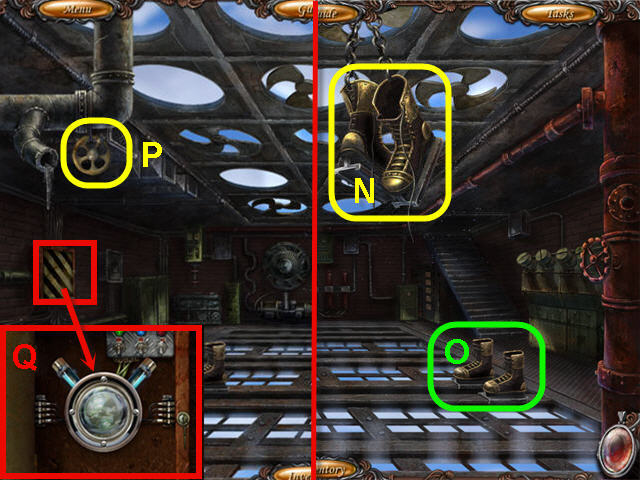
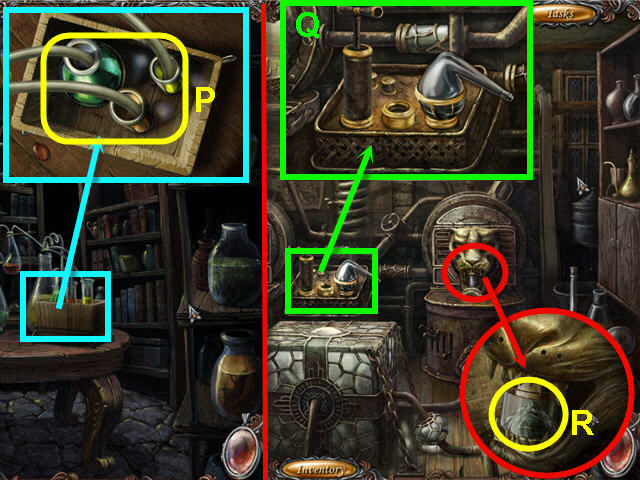
- Take the MAGNET (P) and VALVE (Q).
- Head straight.
- Use the FIREPLACE TOOL on the door (R) and head through.
- Examine the fountain; click on the cover.
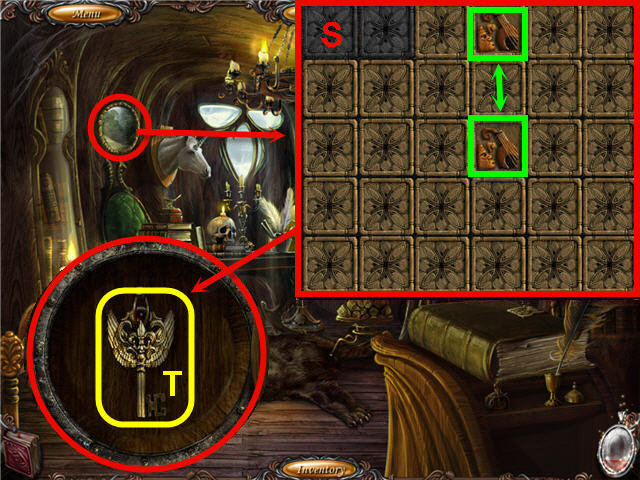
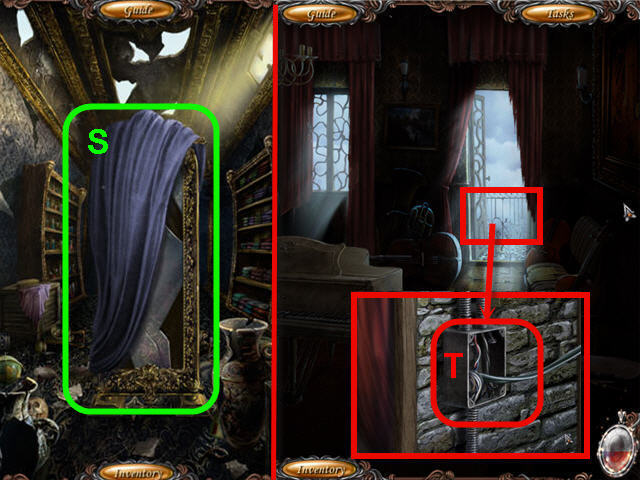
- Place the VALVE on the stem to trigger a puzzle.
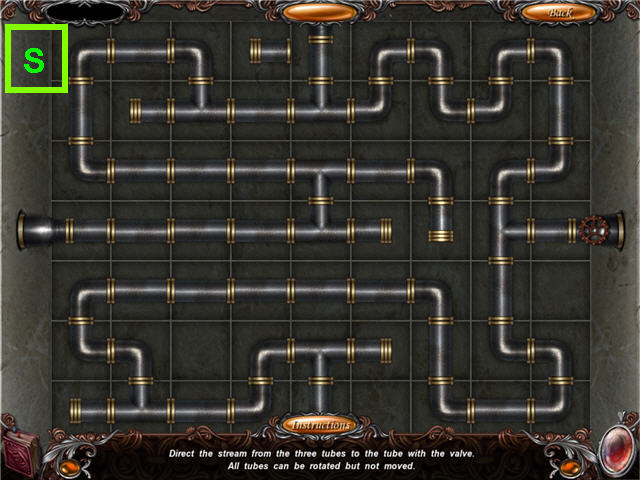
- Connect the pipes so that no steam escapes.
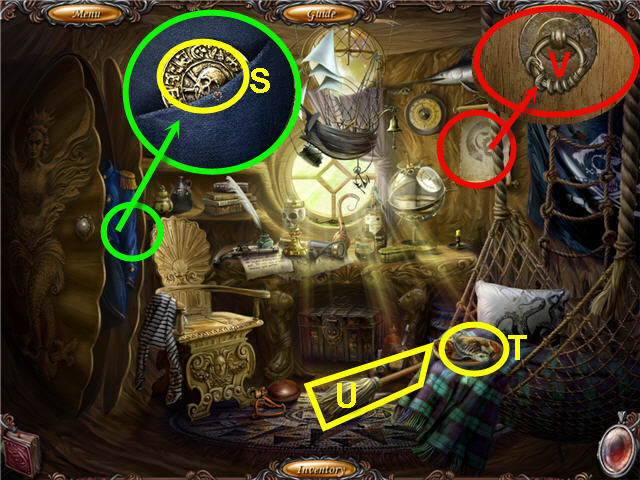
- See screenshot (S) for solution.
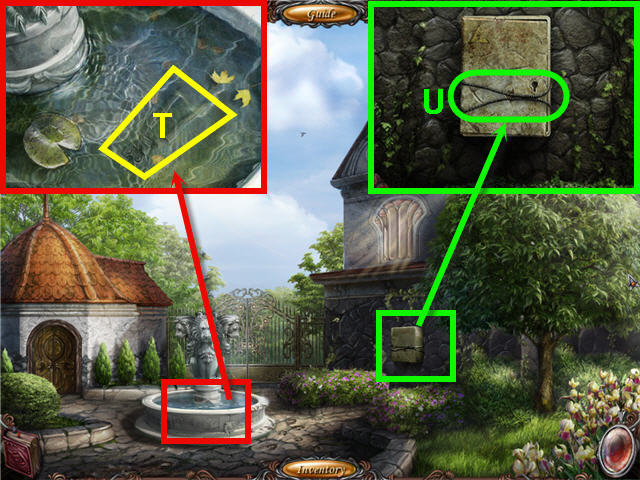
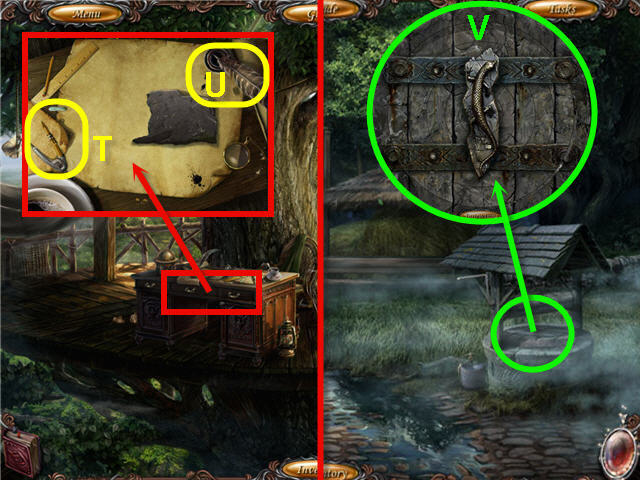
- Examine the fountain; take the WIRE CUTTER (T).
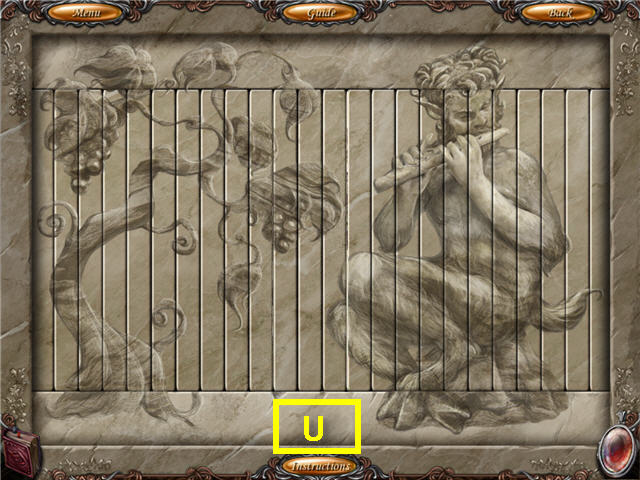
- Examine and use the WIRE CUTTER on the electrical box (U).
- Open the electrical box and examine to trigger a puzzle.
- Connect the wires so that the combinations of the colored wires create the color of the switches.
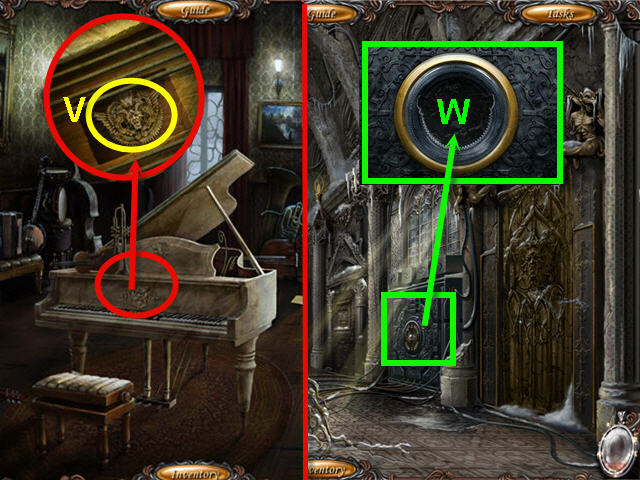
- See screenshot (V) for solution.
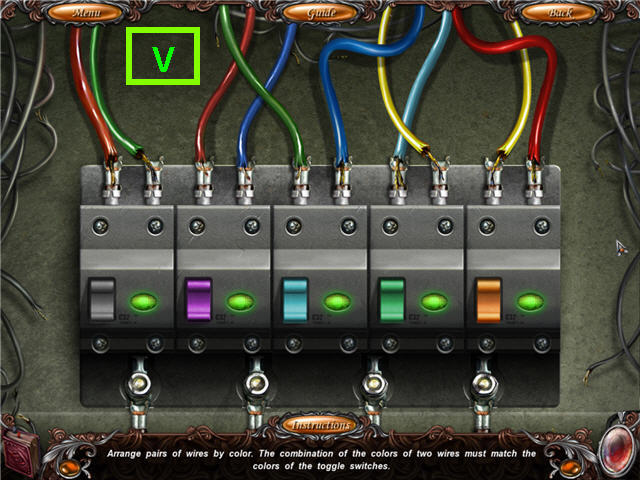
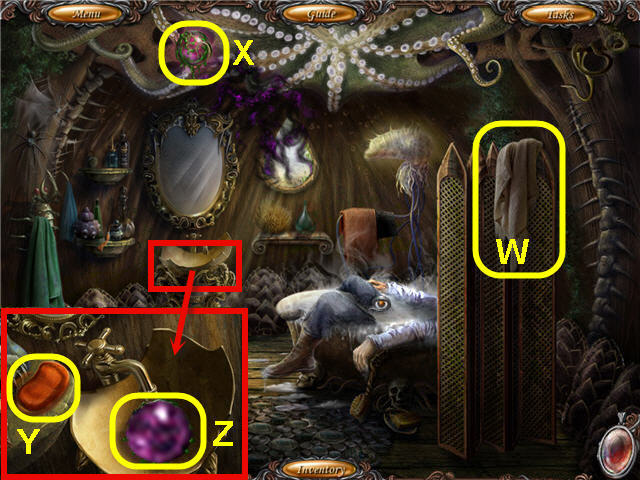
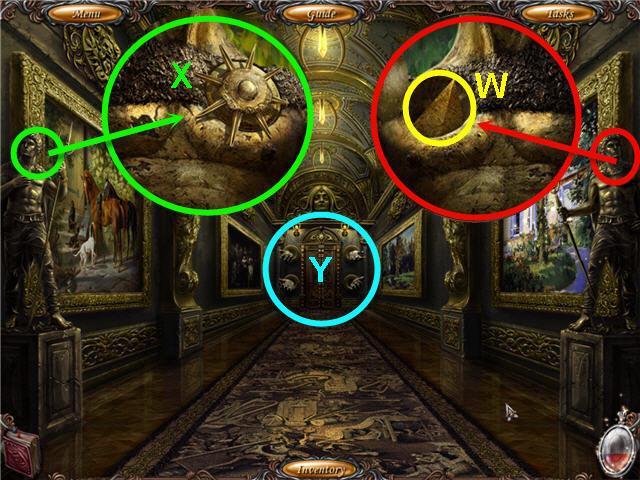
- Examine the workshop door; use the ELECTRIC KEY CARD on the slot (W).
- Enter the workshop.
- Examine the lock; use the MAGNET on the stuck key (X).
- Open the cabinet; examine and take the CLAW HAMMER (Y).
- Back out two times.
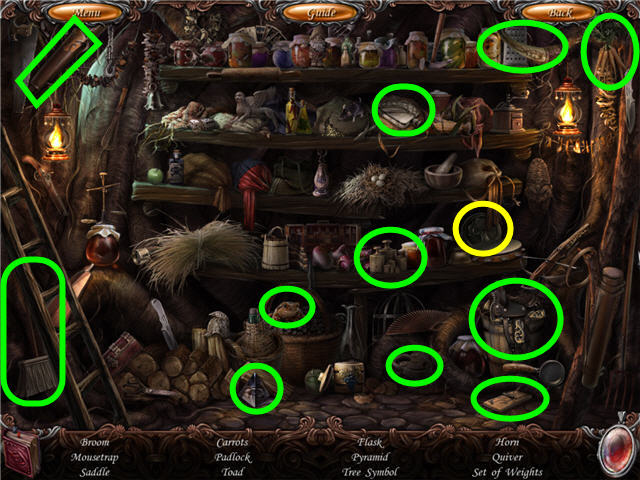
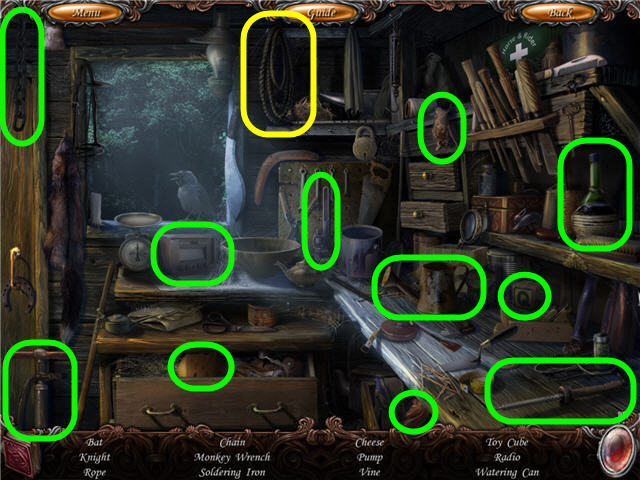
- Click on the fireplace to access a Hidden Object Scene.
- Find the items listed and get KEYS.
- Head into the workshop.
- Examine and use the KEYS on the locked cabinet.
- Click on the opened cabinet to access a Hidden Object Scene.
- Find the items listed.
- Get the ELECTRICAL TAPE.
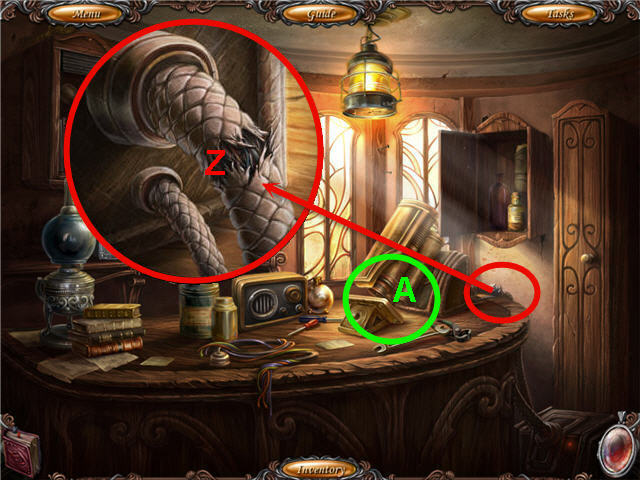
- Examine and use the ELECTRICAL TAPE on the broken wire. (Z).
- Click on the laser (A) to access a Hidden Object Scene.
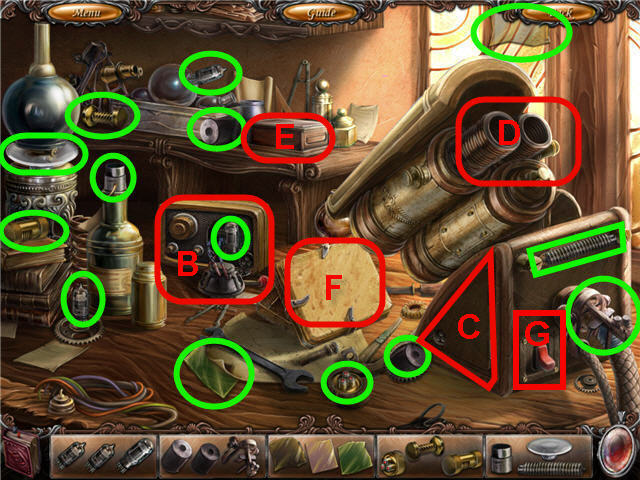
- Find the fragments and get a LAMP TRANSISTOR, LASER PART, GLASS, SCREWDRIVER and SUCTION CUP.
- Use the SCREWDRIVER on the radio (B) and take the lamp transistor part.
- Use the SCREWDRIVER on the panel (C).
- Place the LAMP TRANSISTOR in the open panel and place the LASER PART on the top (D).
- Place the SUCTION CUP on the box (E); take the glass piece.
- Place the GLASS on the holder (F) and flip the switch (G).
- Take the GLASS LENSES.
- Head back to the bedroom.
- Click on the wardrobe to access a Hidden Object Scene.
- Find the items listed and get GOGGLE FRAMES.
- In Inventory; combine the GOGGLE FRAMES and GLASS LENSES to get PROTECTIVE GLASSES.
- Back out.
- Use the PROTECTIVE GLASSES on the right door.
- Click on the apparition of Lily.
Chapter 2 – The Forest Man
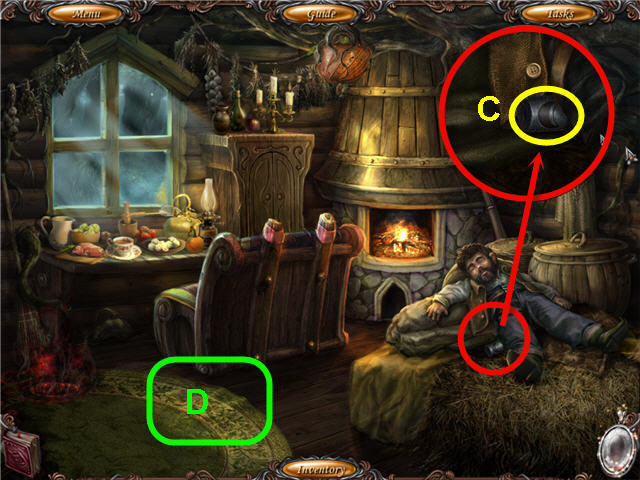
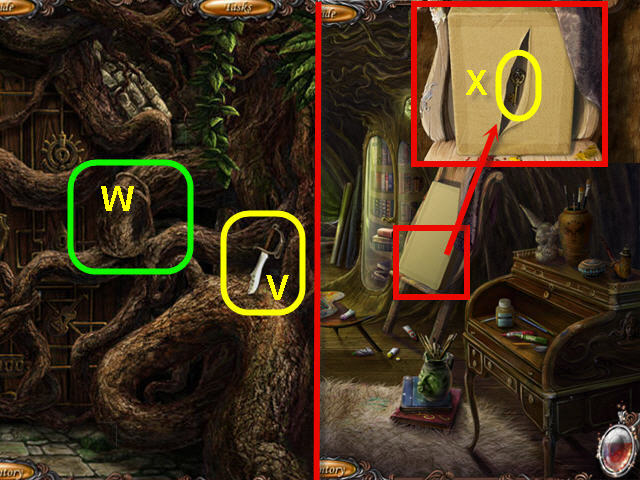
- Examine the wardrobe; use the FIREPLACE TOOL to get the KEY (H).
- Examine Lily; take the GATE'S LOCK PART (I).
- Head outside.
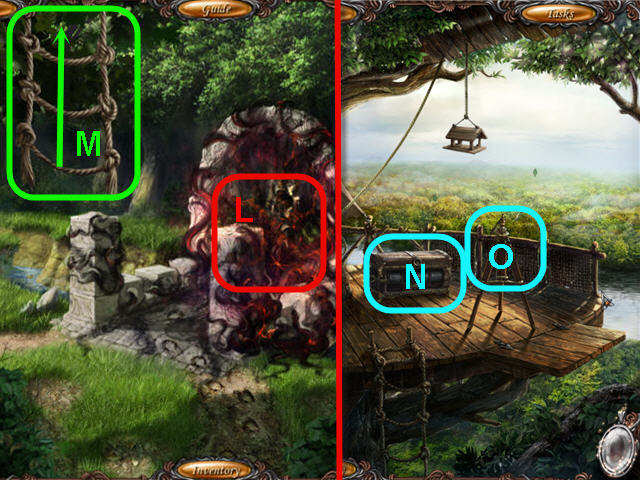
- Examine the gate; place the GATE'S LOCK PART on the lock to trigger a puzzle.
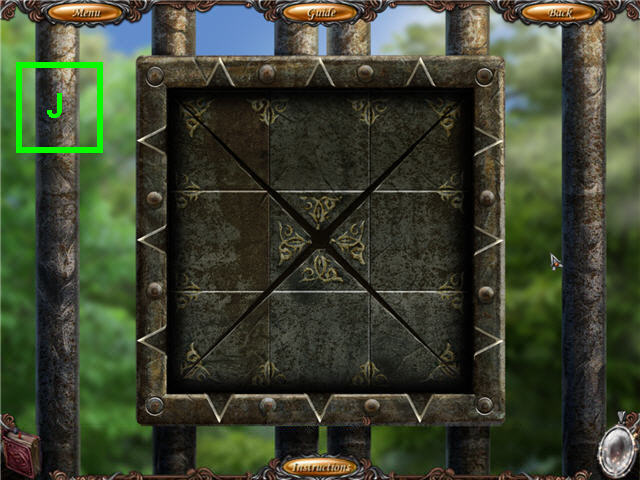
- Move the pieces using the arrows to complete the lock.
- The starting layout is random; see screenshot (J) for solution.
- Examine the gate; insert the KEY and enter.
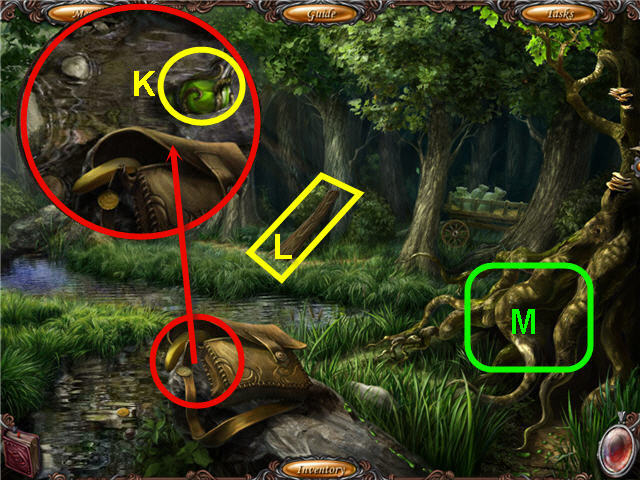
- Examine the knapsack; take the GREEN POTION (K).
- Take the LONG BOARD (L).
- Use the GREEN POTION on the roots (M) to trigger a puzzle.
- Watch the color changes of the bottle (N) and click on a matching colored root (O) to eliminate it. See screenshot for example.
- You now have a NEAR-EMPTY VIAL in inventory.
- Enter the tree to access a Hidden Object Scene.
- Find the items listed.
- Get a TREE SYMBOL.
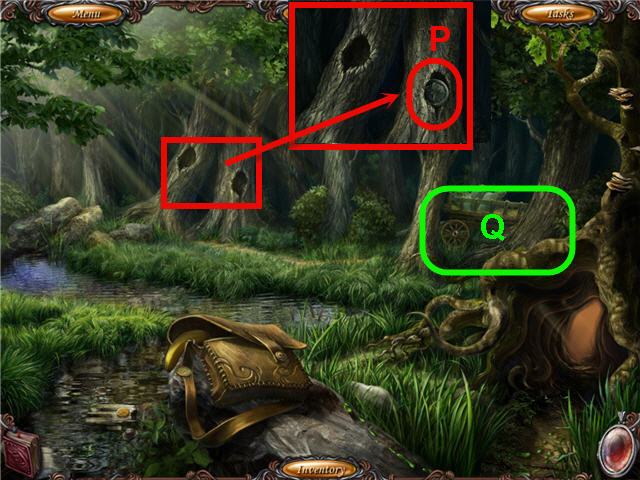
- Examine the tree holes; place the TREE SYMBOL in the right hole (P).
- Click on the cart (Q) to access a Hidden Object Scene.
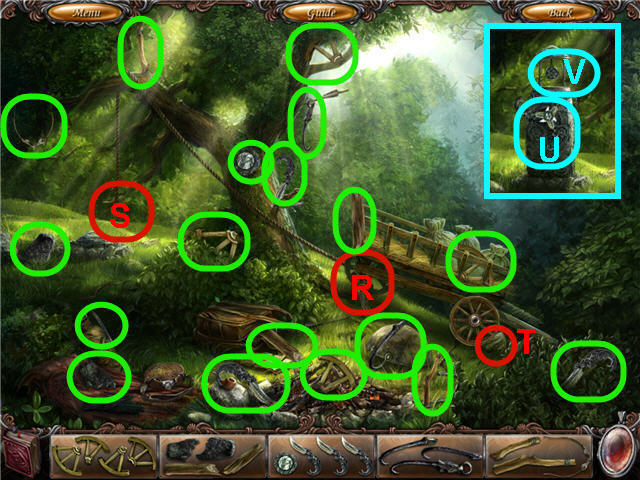
- Find the fragments and get a WHEEL, HAMMER, VALVE-HANDLE, HOOK and SLINGSHOT.
- Place the WHEEL on the cart axle (R).
- Place the HOOK on the rope (S).
- Use the HAMMER on the stone (T).
- Use the VALVE-HANDLE on the pedestal; turn the valve (U).
- Try and take the symbol (V); use the SLINGSHOT on the crow.
- Take the dropped FLOWER SYMBOL.
- Examine the holes in the tree; place the FLOWER SYMBOL in the left hole.
- Head straight through the trees.
- Use the CLAW HAMMER on the boards (W-X) to get 2 SHOT BOARDS and NAILS.
- Take the 2nd LONG BOARD (Y).
- Place the 2 LONG BOARDS and the 2 SHOT BOARDS right of the bridge (Z).
- Use the NAILS and CLAW HAMMER on the SHOT BOARDS.
- Head across the boards.
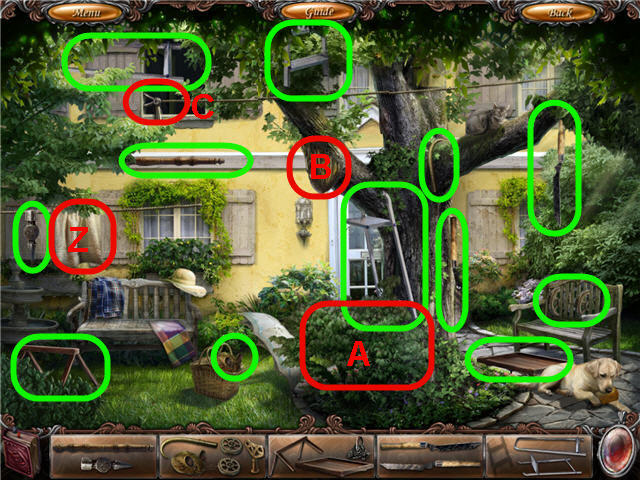
- Examine the bench; take the CANE (A).
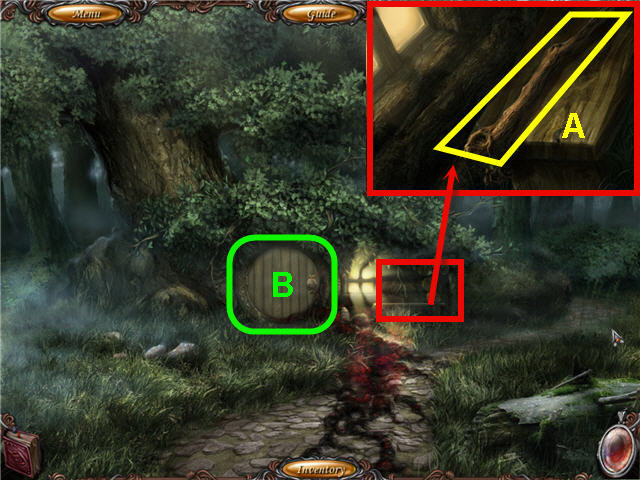
- Open the tree house door (B) and use the PROTECTIVE GLASSES to enter.
- Click on the two apparitions.
- Examine the forest man; take the CHEST DIGIT (C).
- Move the rug off the hatch (D) and click on it.
- Back out two times.
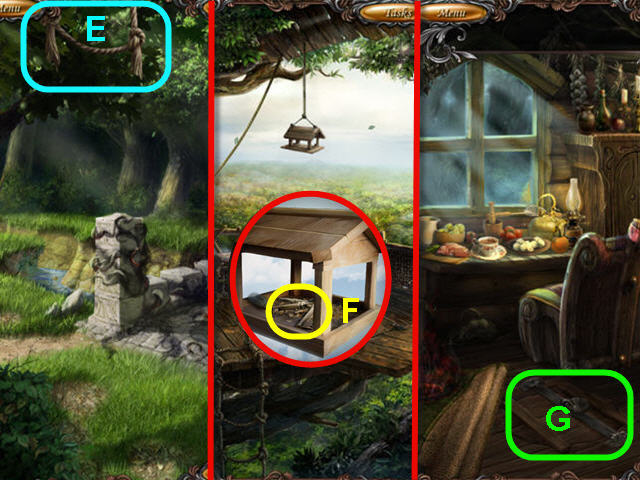
- Use the CANE on the rope ladder (E); head up.
- Examine the birdhouse; take the KEYS (F).
- Head to the tree house.
- Use the KEYS on the hatch (G) and click on the opened hatch.
- Back out three times. Head into the tree to access a Hidden Object Scene.
- Find the items listed and get a LADDER.
- Head into the tree house.
- Use the LADDER on the hatch.
- Enter the hatch to access a Hidden Object Scene.
- Find the fragments to get a FILTER, FUSES, SWITCH HANDLE, VALVE and WRENCH.
- Place the FUSES in the box (H).
- Place the SWITCH HANDLE on the box and pull it to find the remaining fragments.
- Place the FILTER on the hole (I).
- Place the VALVE on the stem (J).
- Use the WRENCH on the bolt (K).
- Turn the VALVE; take the RED ORB.
- Back out two times.
- Use the RED ORB on the red fog (L) to get a LOADED RED ORB.
- Head up the ladder (M).
- Examine the chest (N); place the CHEST DIGIT on the slot and note we need the combination.
- Click on the tripod (O).
- Go to the workshop.
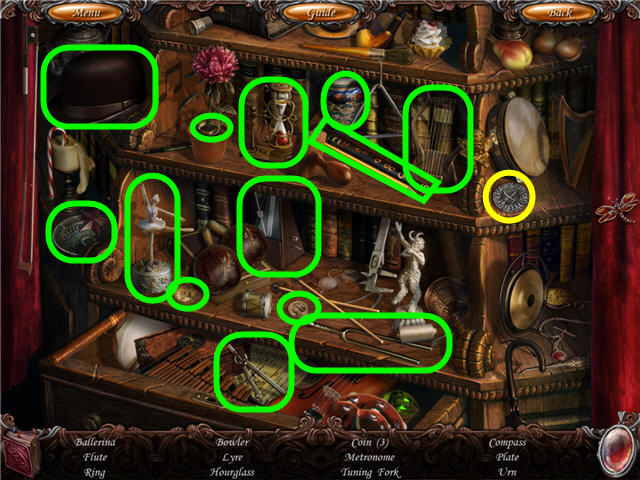
- Click on the shelf to access a Hidden Object Scene.
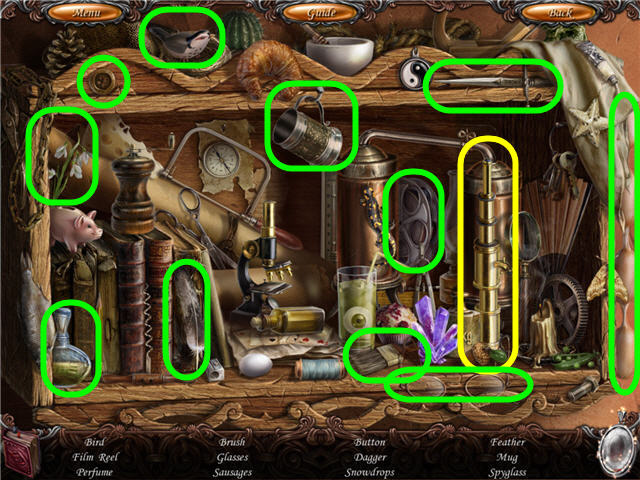
- Find the items listed and get a SPYGLASS.
- Head back to the observation deck.
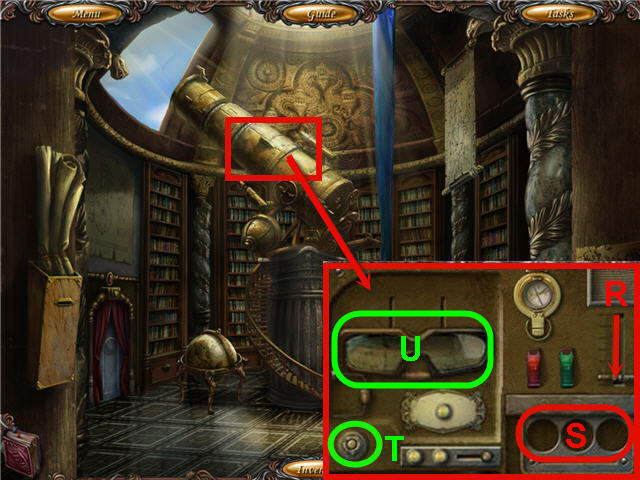
- Place the SPYGLASS on the tripod and look through.
- Find the location of the sun (P), moon (Q), star (R), and arrow (S) in the scenes by using the side arrow.
- Back out of the spyglass only.
- Examine the desk; take the SHEET OF PAPER (T) and INK (U).
- Go down the path right of the tree house.
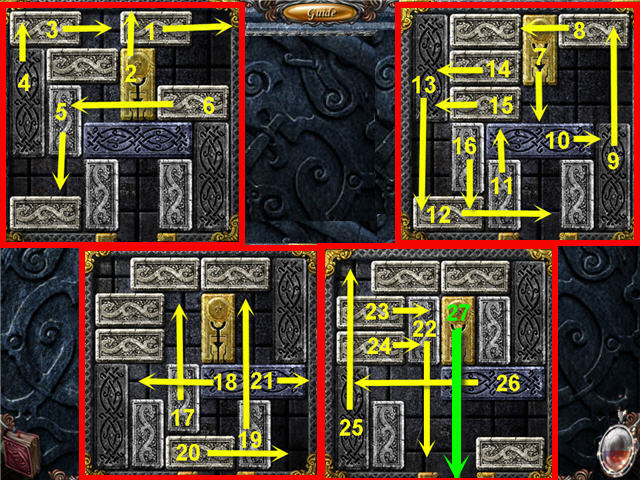
- Click on the well to trigger a puzzle.
- Turn the rings to complete the picture. See screenshot (V) for solution.
- Open the shutter on the window left of the door.
- Examine the window; remove the pin to access a Hidden Object Scene.
- Find the items listed and get a ROPE.
- Open the drawer to get the cheese.
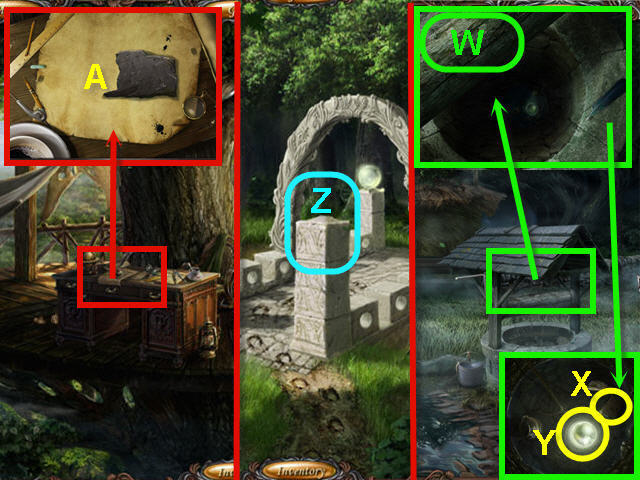
- Examine the well; tie the ROPE to the beam (W).
- Click down the well twice.
- Take the STONE PLATE PART (X) and BRIDGE SPHERE (Y).
- Exit the well and back out twice.
- Place the BRIDGE SPHERE on the pillar (Z).
- Climb up the rope.
- Examine the desk; place the STONE PLATE PART on the desk (A).
- Place the INK and the SHEET OF PAPER on the stone plate.
- Exit and head into the tree house.
- Click on the table to access a Hidden Object Scene.
- Find the items listed and get a ROLLING PIN.
- Go to the observation deck.

- Examine the desk; use the ROLLING PIN on the paper (B).
- Examine the chest; use the code from the desk and the spyglass to arrange the symbols (C).
- Solution: Moon, Sun, Arrow, Star.
- Examine the chest; take the BRIDGE SPHERE (D).
- Exit the deck and place the BRIDGE SPHERE on the pillar.
- Click on a sphere to trigger a puzzle.
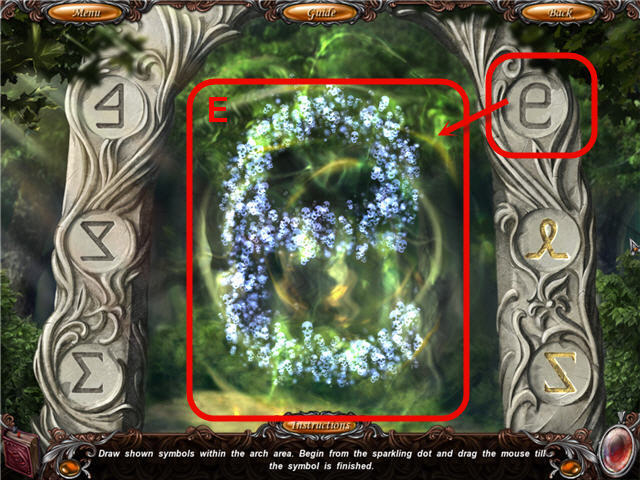
- Duplicate the symbol shown by click-hold and dragging your cursor in the same pattern (E). Repeat for all 6 symbols.
- Enter through the portal.
Chapter 3 – The Portal
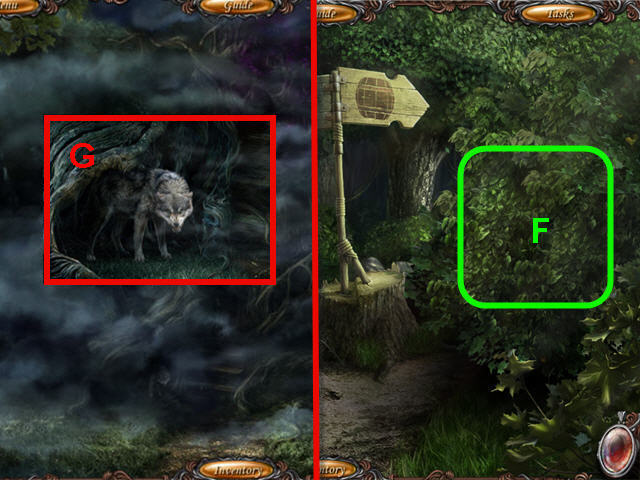
- Click on the bushes (F).
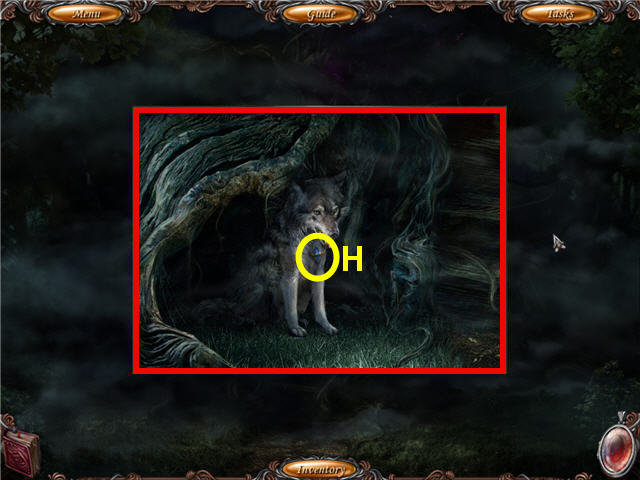
- Head left and click anywhere to see the wolf; click on the wolf (G).
- Back out to the bridge and head to the shed behind the tree house.
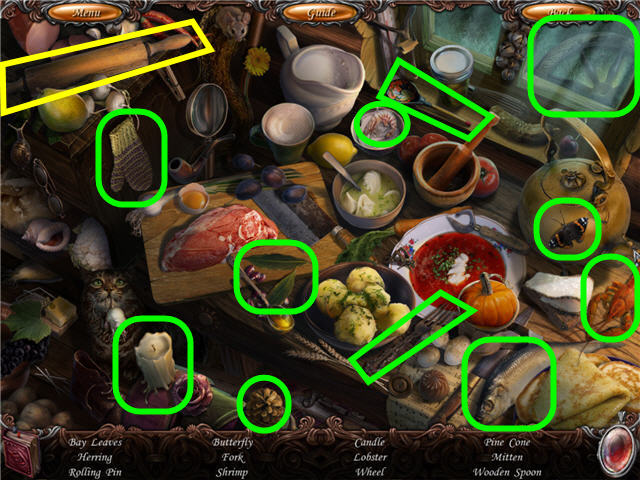
- Click on the door to access a Hidden Object Scene.
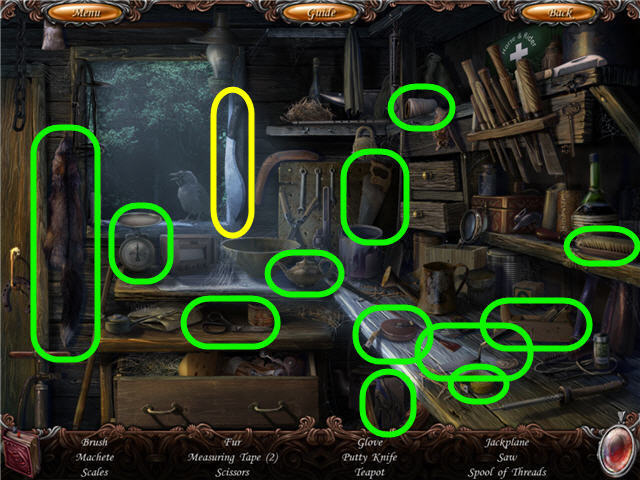
- Find the items listed and get a MACHETE.
- Back out and head into the tree house.
- Click on the table to access a Hidden Object Scene.
- Find the items listed and get MEAT.
- Open the kettle to find the bug.
- Go back through the portal; head left.
- Examine the area; give the MEAT to the wolf.
- Take the WOLF'S CRYSTAL (H).
- Back out to the crossroad.
- Use the MACHETE on the bushes three times and head right.
- Click on the barrel to access a Hidden Object Scene.
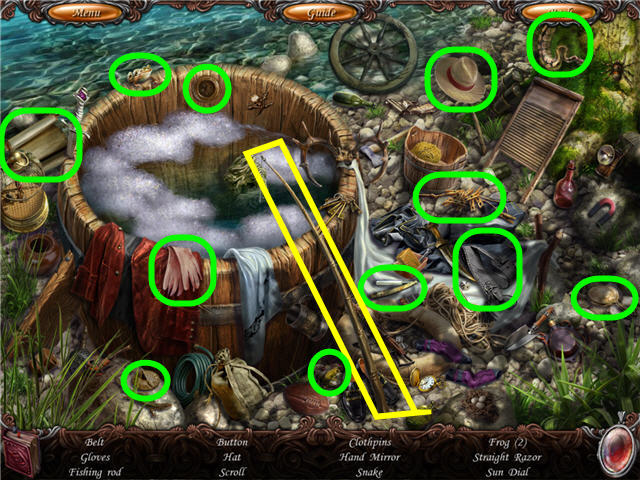
- Find the items listed and get a FISHING ROD.
- Combine the WOLF'S CRYSTAL and the FISHING ROD to get ROD WITH A CRYSTAL.
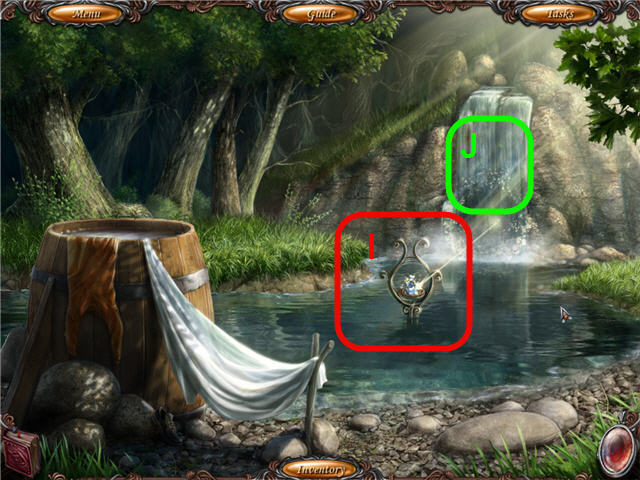
- Use the ROD WITH A CRYSTAL on the stand (I).
- Head to the waterfall (J) to access a Hidden Object Scene.
- Find the fragments to get a BASKET, BELLOWS, SOPORIFIC HERBAGE, HANDLE and MILLSTONES.
- Place the MILLSTONES and the SOPORIFIC HERBAGE on the stand (K).
- Click on the SOPORIFIC HERBAGE to crush them; use the BELLOWS on the dust on the ground.
- Place the HANDLE on the wheel (L) and crank it to lower the cage.
- Open the cage; use the BASKET on the cubs to get WOLF'S CUBS.
- Go to the wolf.
- Examine the area; give the WOLF'S CUBS to the wolf.
- Enter through the bath window (M).
- Examine the body; take the WATER KEY (N).
- Exit the room; enter the sailor's room.
- Click on the ship to access a Hidden Object Scene.
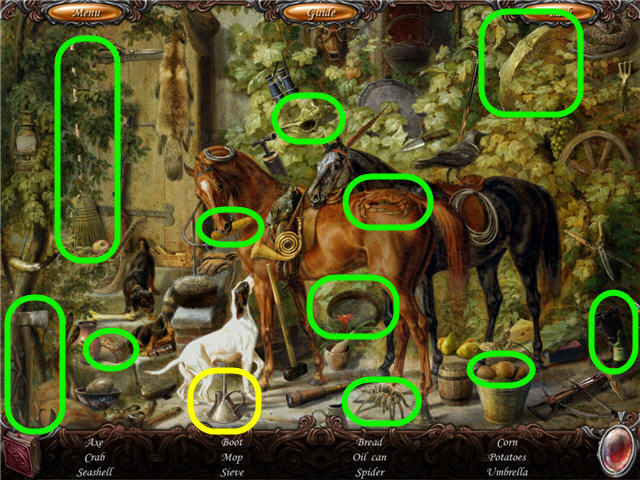
- Find the fragments and get a CANNON, CANNONBALLS, TORCH, WHEEL and HOOK.
- Place the WHEEL on the helm (O) and click on it; take the cannonball.
- Place the CANNON on the deck (P).
- Place the CANNONBALLS and TORCH on the cannon.
- Place the HOOK on the right cannon (Q); click to fire.
- Click on the hook in the hole (R); take the SAILOR KEY.
- Examine the sailor uniform; take the GOLDEN COIN (S).
- Take the FISH SKELETON (T) and MOP (U).
- Examine the scroll; click on it to expose the dragon mold (V).
- Back out.
- Enter the bath window.
- Take the TOWEL (W).
- Use the MOP and the TOWEL on the violet orb to get the WRAPPED DIRTY ORB (X).
- Examine and place the WRAPPED DIRTY ORB in the sink.
- Take the SOAP (Y).
- Turn the faucet on and take the PURPLE ORB (Z).
- Back out of the room.
- Use the PURPLE ORB on the purple fog to get a LOADED PURPLE ORB.
- Head into the musicians window.
- Click on the shelves at the far end to access a Hidden Object Scene.
- Find the items listed and get a SILVER COIN.
- Click on the piano to trigger a puzzle.
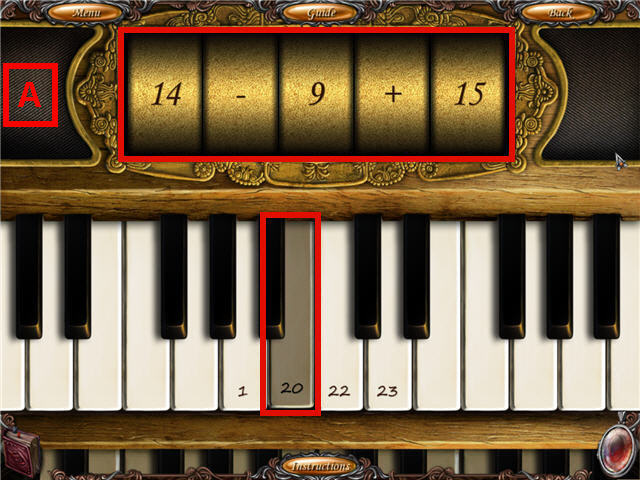
- Rotate the digits above to make a mathematical equation that equals a number on a key below.
- Press the key when solution is complete and the key will stay down. Repeat for all numbered piano keys.
- The numbers are random. See screenshot (A) for example.
- Examine the top panel of the piano; pull down and take the MUSIC KEY (B).
- Examine the music stand; click on the note (C).
- Go into the sailor's window.
- Examine the chest.
- Place the SILVER COIN and GOLD COIN in the slots (D) to trigger a puzzle.
- The goal is to move the silver coins to the right and the gold coins to the left (E).
- Solution: click the following spaces from left to right; 4, 7, 5, 3, 6, 5, 8, 9, 7, 4, 5, 2, 4, 3, 6, 1, 2, 8, 10, 9, 7, 4, 6, 5, 8, 6, 3, 4, 5, 7, 5. 6.
- Examine the chest; take the MERMAID STATUETTE.
- Head into the leader's window; examine the fireplace mantel.
- Go into the hunter's window.
- Click on the chests to access a Hidden Object Scene.
- Find the items listed and get a BEAR STATUETTE.
- Open the right box to get the comb.
- Open the top chest to get the billiard ball.
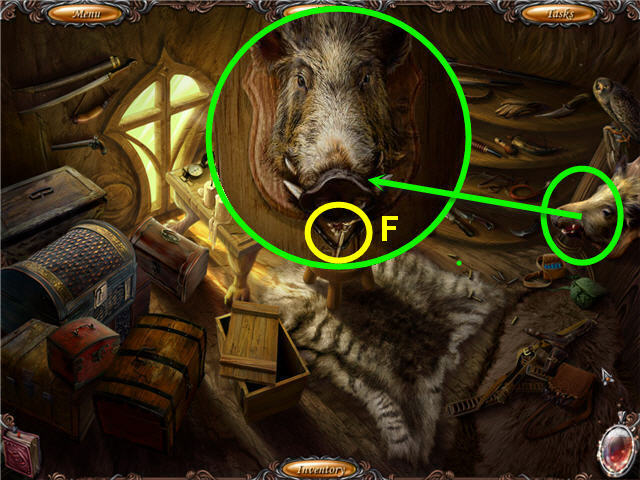
- Examine the boar head.
- Click on the boar's nose; take the HUNTER KEY (F).
- Go into the musician's window.
- Click on the shelves in the back to access a Hidden Object Scene.

- Find the items listed and get a SATYR STATUETTE.
- Go into the kitchen window.
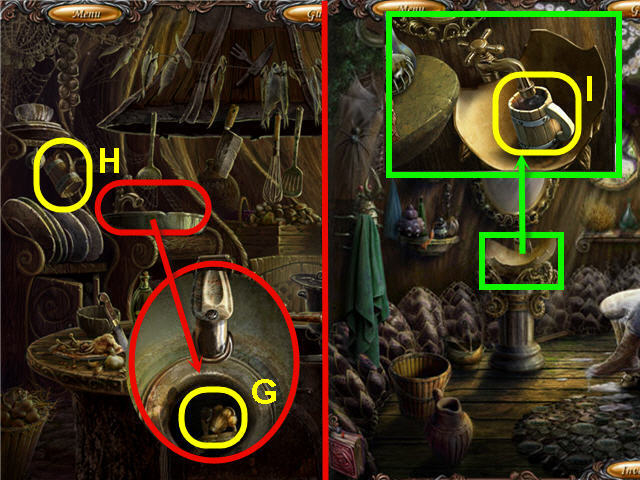
- Examine the sink; remove the strainer.
- Use the MAGNET to get the COOKER KEY (G).
- Take the MUG (H).
- Go into the bath window.
- Examine the sink; place the MUG in the sink and turn on the tap.
- Take the MUG WITH WATER (I).
- Head into the artist window.
- Examine the easel; take the GLUE (J).
- Examine the table; use the CLAW HAMMER on the glass three times.
- Take the ARTIST KEY (K).
- Examine the desk; click on the lock (L).
- Go into the kitchen window.
- Click on the cabinet to access a Hidden Object Scene.
- Find the items listed and get FLOUR.
- Open the middle drawer to get the eyeball and pea.
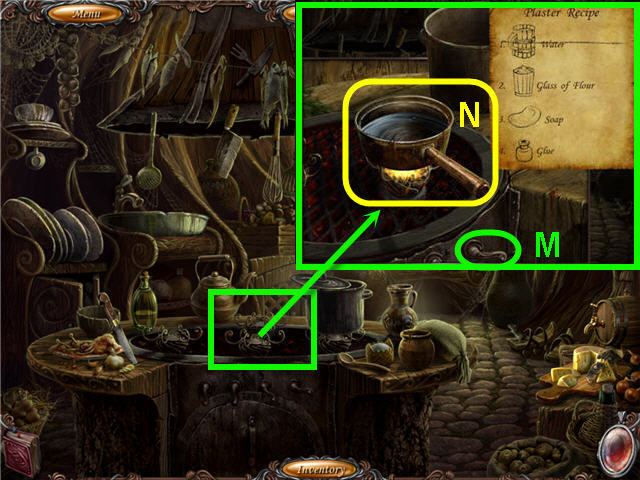
- Examine the stove.
- Place the MUG WITH WATER in the pot; click the handle (M) to turn on the burner.
- Place the FLOUR, SOAP and GLUE into the pot.
- Turn off the burner; take the PLASTER (N).
- Head to the sailor's room.
- Examine the metal form; use the PLASTER on the bottom.
- Click to close the form; click to open.
- Take the DRAGON KEY (O).
- Head to the artists room.
- Examine the desk; place the DRAGON KEY in the lock.
- Click on the desk to access a Hidden Object Scene.
- Find the fragments and get a BULB BOWL, BULB BOWL HOLDER, LEFT PUPPET, RIGHT GEAR and RIGHT PUPPET.
- Open the bowl to get a bulb holder piece.
- Place the BULB BOWL HOLDER and BULB BOWL on the stand (P).
- Place the RIGHT GEAR and RIGHT PUPPET on the right spindle (Q).
- Place the LEFT PUPPET on the left spindle (R).
- Take the OWL STATUETTE.
- Head to the leader's room.
- Remove the mirror; zoom in to trigger a puzzle.
- Click on any two squares to find the matching sets. See screenshot (S) for example.
- Examine the area when complete and take the LEADER KEY (T).
- Examine the fireplace mantle.
- Place the OWL STATUETTE, SATYR STATUETTE, MERMAID STATUETTE and BEAR STATUETTE on the pedestals to trigger a puzzle.
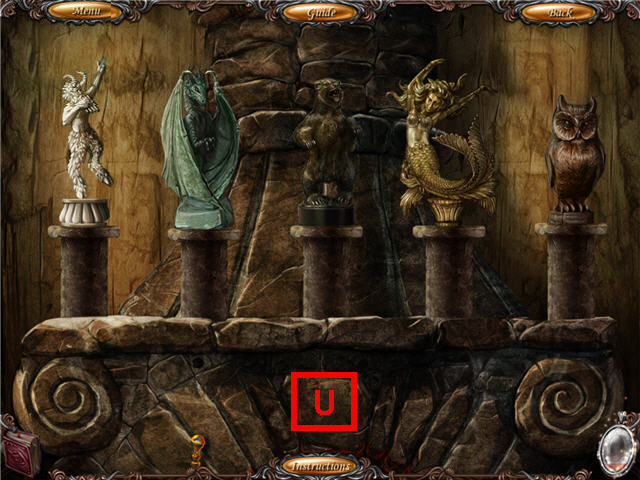
- Arrange the statuettes so that all the bases are equal height.
- Solution: from left; satyr, dragon, bear, mermaid, owl. See screenshot (U) for solution.
- Head down the newly-opened passage.
- Take the KNIFE (V).
- Use the NEAR-EMPTY VIAL on the roots (W) to get an EMPTY VIAL.
- Head to the artists room.
- Examine the easel; use the KNIFE on the canvas.
- Take the SMALL KEY (X).
- Head to the leader's room.
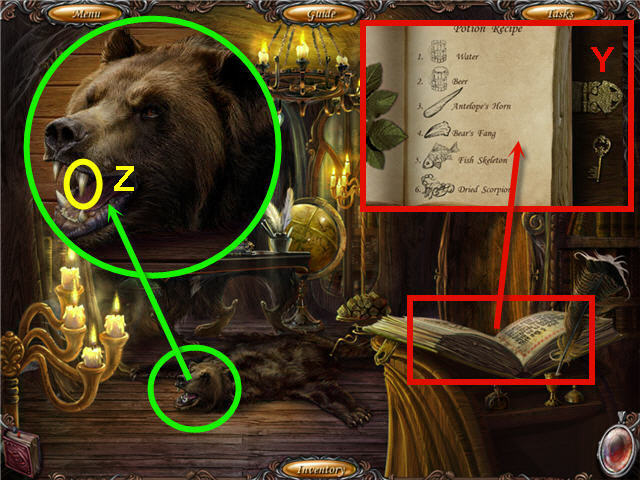
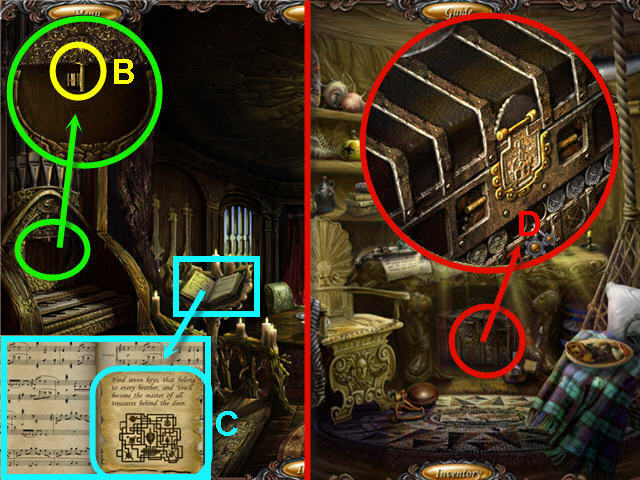
- Examine the book; use the SMALL KEY on the lock and note the recipe (Y).
- Examine the bear rug; use the WIRE CUTTER to get a BEAR'S FANG (Z).
- Head to the hunter's room.
- Click on the chests to access a Hidden Object Scene.
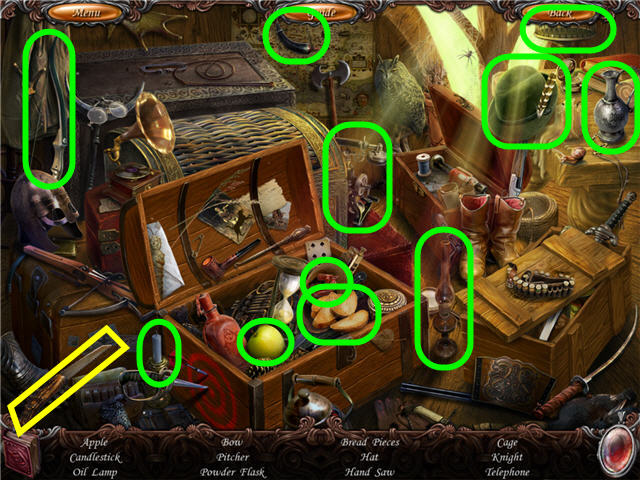
- Find the items listed and get a HAND SAW.
- Open the two chests to get hidden items.
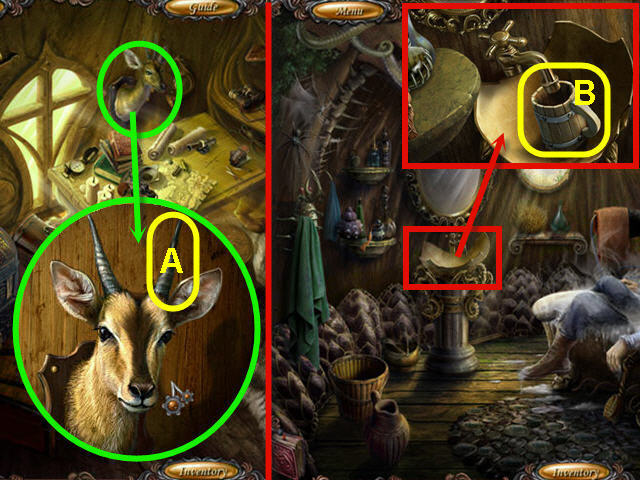
- Examine the antelope; use the HAND SAW to get the ANTELOPE'S HORN (A).
- Go into the bath window.
- Examine the sink; use the MUG on the sink.
- Turn on the faucet; take the MUG WITH WATER (B).
- Head to the kitchen.
- Click on the cupboard to access a Hidden Object Scene.
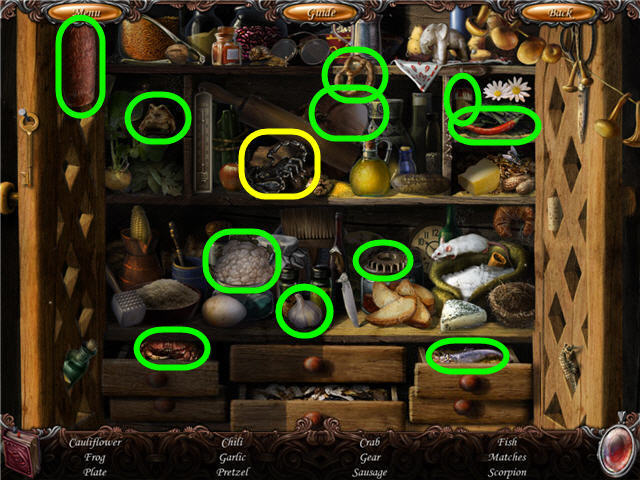
- Find the items.
- Get a SCORPION.
- Examine the stove; move the pot behind the recipe.
- Place the MUG WITH WATER in the pot (C) and get a MUG.
- Back out of the stove close-up only.
- Examine and use the MUG on the keg; turn the spigot.
- Take the MUG WITH BEER (D).
- Examine the stove; click the handle to turn on the burner.
- Place the MUG WITH BEER, ANTELOPE'S HORN, BEAR'S FANG, FISH SKELETON and SCORPION in the pot.
- Turn off the burner; use the EMPTY VIAL on the pot to get a MAGIC POTION.
- Head to the leader's room and down the passage.
- Use the MAGIC POTION on the roots.
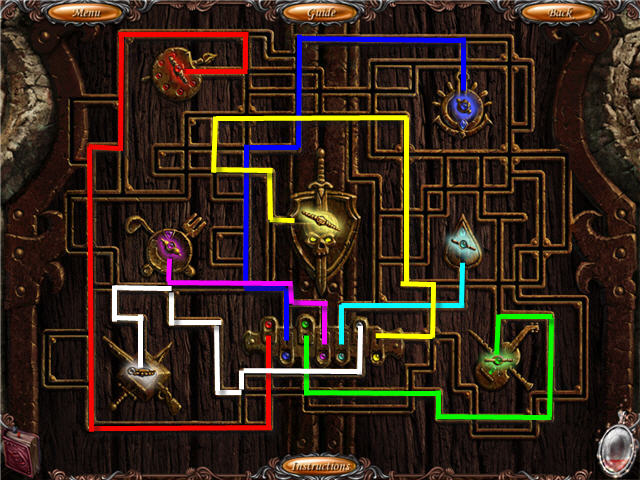
- Place the ARTIST KEY, SAILOR KEY, WATER KEY, MUSIC KEY, HUNTER KEY, and COOKER KEY in the keyholes clockwise from upper left.
- Place the LEADER KEY in the center lock to trigger a puzzle.
- Move the keys to their matching colored slots.
- Your path will be blocked at random points; see screenshot for an example only.

- Enter through the portal.
- Watch the cutscene.
Chapter 4 – Weather Hall
- Take the FLAG (E) and SPIRE (F).
- Use the SPIRE on the broken dome (G) three times.
- Place the FLAG on the SPIRE (H); climb down.
- Take the METAL CANE (I).
- Combine the METAL CANE and MAGNET to get a CANE WITH MAGNET.
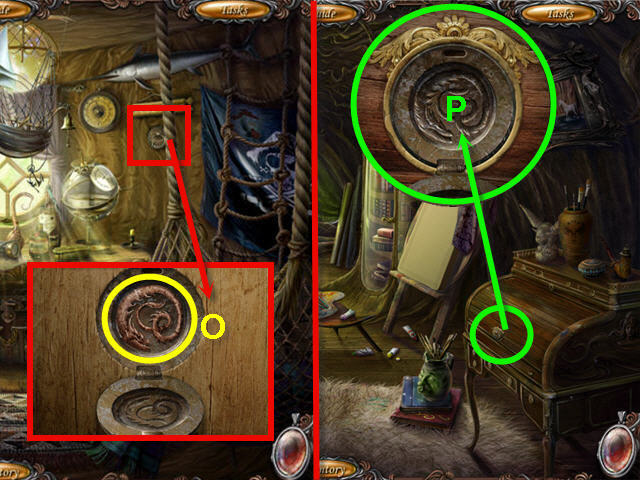
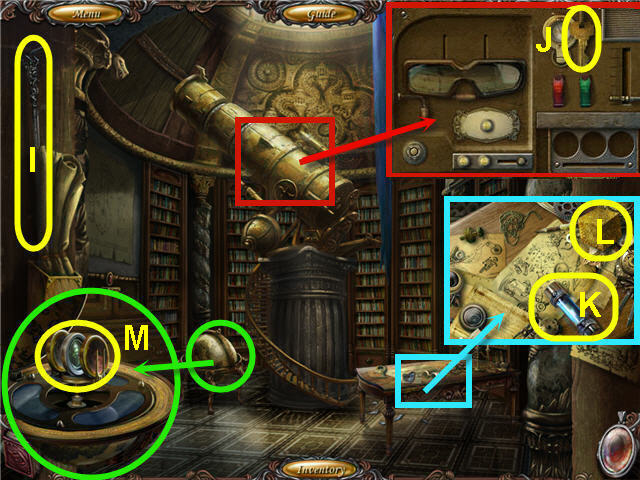
- Examine the telescope; take the KEY (J).
- Examine the table; take the FUSE (K) and GOLDEN CUBE (L).
- Examine the globe; use the KEY to unlock and take the LENSES (M).
- Back out of the room to trigger a puzzle.
- Click on the pins in the correct order to keep them all in.
- If an incorrect pin is clicked all pins will reset.
- The order is random; see screenshot for my solution.
- Use the CANE WITH MAGNET to get the SPECIAL SKATES (N).
- Use the SPECIAL SKATES on the rails (O).
- Head left.
- Take the VALVE (P).
- Examine and open the fuse box; place the FUSE inside (Q).
- Head right, go upstairs.
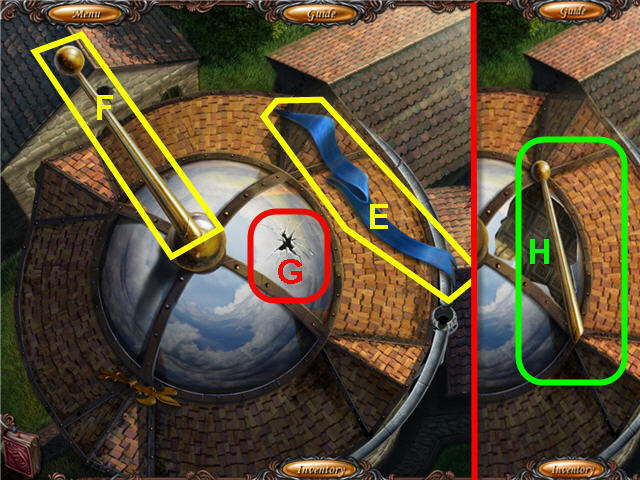
- Examine the telescope.
- Slide the lever down (R); place the LENSES in the slots (S).
- Place the VALVE on the stem (T) and turn it.
- Click on the sunglasses (U) to trigger a puzzle.
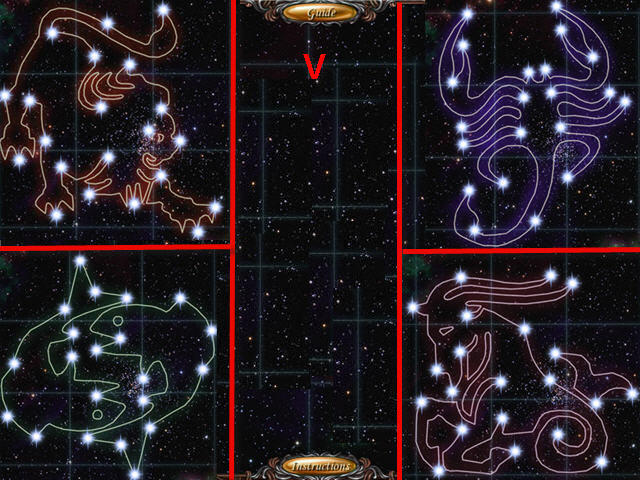
- Duplicate the constellation on the right by placing the stars on the grid.
- See screenshot (V) for my solutions.
- Examine the door.
- Press in the panels that match the constellations that you completed in the telescope puzzle.
- See screenshot for my solution.
- Click on the door and enter when complete.
- Examine the right statue; open the brooch; take the GOLDEN PYRAMID (W).
- Examine the left statue; try and take the brooch (X).
- Examine the door (Y) and click on it.
- Click on the right painting to access a Hidden Object Scene.
- Find the fragments and get a HAMMER, MECHANICAL MOUSE, PLATFORM, PRUNERS and STEPLADDER.
- Move the towel (Z) to get the hammer part.
- Use the PRUNERS to trim the bushes (A); take the platform part.
- Use the HAMMER on the beehive (B) to get the mechanical mouse part.
- Use the STEPLADDER on the pulley (C).
- Hang the PLATFORM on the rope.
- Place the MECHANICAL MOUSE on the PLATFORM; take the GOLDEN CYLINDER the dog dropped.
- Click on the left painting to access a Hidden Object Scene.
- Find the items listed.
- Get an OIL CAN.
- Examine the left statue; use the OIL CAN on the brooch.
- Open the brooch; take the GOLDEN SPHERE (D).
- Examine the door.
- Place the place the GOLDEN CUBE, GOLDEN CYLINDER, GOLDEN SPHERE and GOLDEN PYRAMID in the hands (E) clockwise from upper left.
- Head straight through the door.
- Head into the left door (F).
- Remove the cover (G); click on the slot on the top of the mirror.
- Take the TRANSISTOR (H).
- Back out.
- Click on the fountain to access a Hidden Object Scene.
- Find the items listed and get a GOLDEN MASK.
- Head into the left door.
- Place the GOLDEN MASK on the top of the mirror (H).
- Enter into the mirror.
- Examine the cabinet; take the EMPTY BULBS (I) and look at the note.
- Examine the console; remove the plug (J).
- Back out; take the GOLDEN MASK (H) from the mirror.
- Back out two times.
- Click on the left painting to access a Hidden Object Scene.
- Find the items listed.
- Get a PUMP.
- Head straight; go through the right rear door (J).
- Take the TRANSISTOR (K).
- Remove the cover off the mirror.
- Place the GOLDEN MASK on the top of the mirror (L).
- Enter the mirror.
- Examine the holder; place the EMPTY BULBS inside (M).
- Click on the left bookshelf (N) to trigger a puzzle.
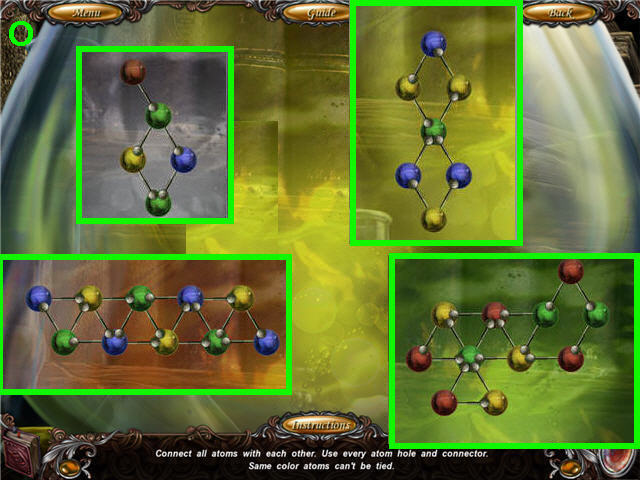
- Connect all the atoms by using every hole and connector.
- See screenshot (O) for solution.
- Examine the holder; take the RESTORING POTION COMPONENTS (P).
- Back out; take the GOLDEN MASK from the mirror.
- Back out; head into the left room.
- Place the GOLDEN MASK on the mirror and enter through.
- Examine the console.
- Place the PUMP and the RESTORING POTION COMPONENTS on the console (Q).
- Click the PUMP handle to activate.
- Examine the right lion when the machine finishes processing.
- Take the RESTORING POTION (R).
- Back out; take the GOLDEN MASK from the mirror.
- Back out and enter the door on the far right.
- Move the cover off the mirror (S).
- Use the RESTORING POTION on the broken mirror.
- Place the GOLDEN MASK on the top of the mirror and enter through.
- Examine the doorway; place the 2 TRANSISTORS on the junction box (T).
- Examine the piano to trigger a puzzle.
- Arrange the pieces to complete the picture.
- Click on any two to switch them. See screenshot (U) for solution.
- Examine the piano; click the panel; take the MASK KEY (V).
- Back out two times.
- Examine the metal door.
- Place the MASK KEY in the slot (W) to trigger a puzzle.
- Slide the tiles to make a passage for the gold tile to exit.
- See screenshot for solution.
- Enter into the gold door on the right.

- Examine and use the RESTORING POTION the broken orb (X); take the LOADED GREEN ORB.
- Examine the door lock (Y).
- Back out.
- Click on the fountain to access a Hidden Object Scene.
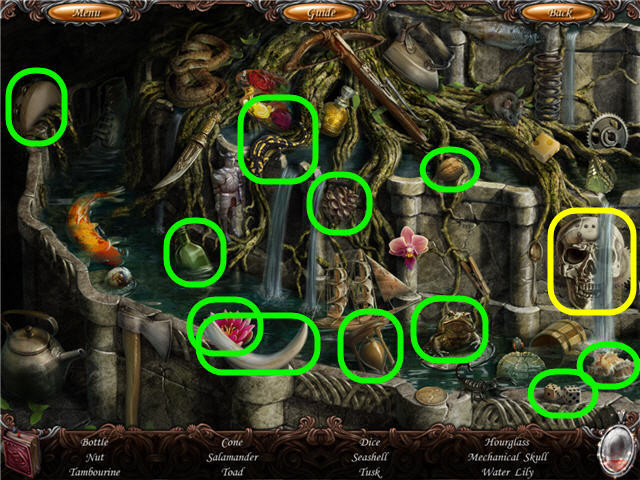
- Find the items listed and get a MECHANICAL SKULL.
- Go through the gold door.
- Examine the door; place the MECHANICAL SKULL on the lock and enter.
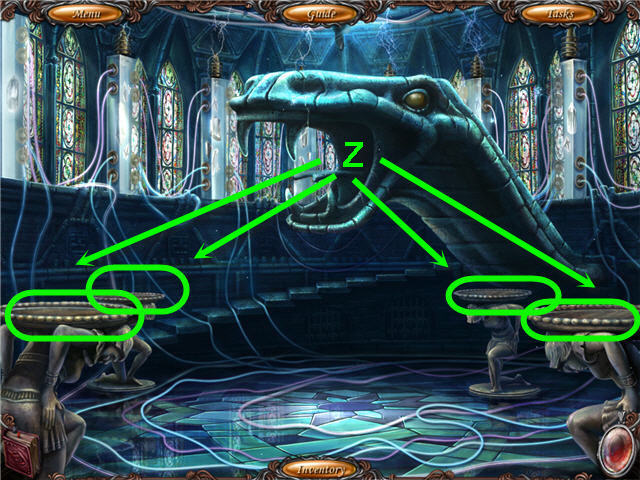
- Place the LOADED BLUE ORB, LOADED RED ORB, LOADED PURPLE ORB and LOADED GREEN ORB on the stands (Z).
- Congratulations! You have successfully completed Sonya

No comments:
Post a Comment